
The Munchables
Event Location: Cocoa-FL
Competition: Solar Energy Cook-Off
Division: 6-8
School: Milwee Middle
Team Size: 4
Team Name: The Munchables
School Name: Milwee Middle School
Student Names: Ellie D., Anuva G., Keira S., Callie W.
Grade Level: Ellie – 8th, Anuva – 8th, Keira – 8th, Callie – 8th
Information: Our school has competed for 11 years and won 7 of those years. This team participated in EnergyWhiz Solar Oven competition last year.
Help From: Some of the inspiration we got for food ideas and recipes have been found on the internet and from our current knowledge, and our teacher helped us in getting the materials suggesting ways to improve our design and menu.
Challenges We Faced: We had to build our oven in a short amount of time, the menu was difficult to come up with, and it was hard to find materials that would work best for our oven’s design.
Idea Origin: The design we came up with originated from looking at solar ovens from past EnergyWhiz competitions and innovating them.
Highest Temperature of Oven: Degrees- 2070 F or 97.20 C Time- 3:32 Weather- Partly cloudy with some drizzle
Competition Information: Date- Saturday, April 22, 2023 Location- Cocoa, Florida
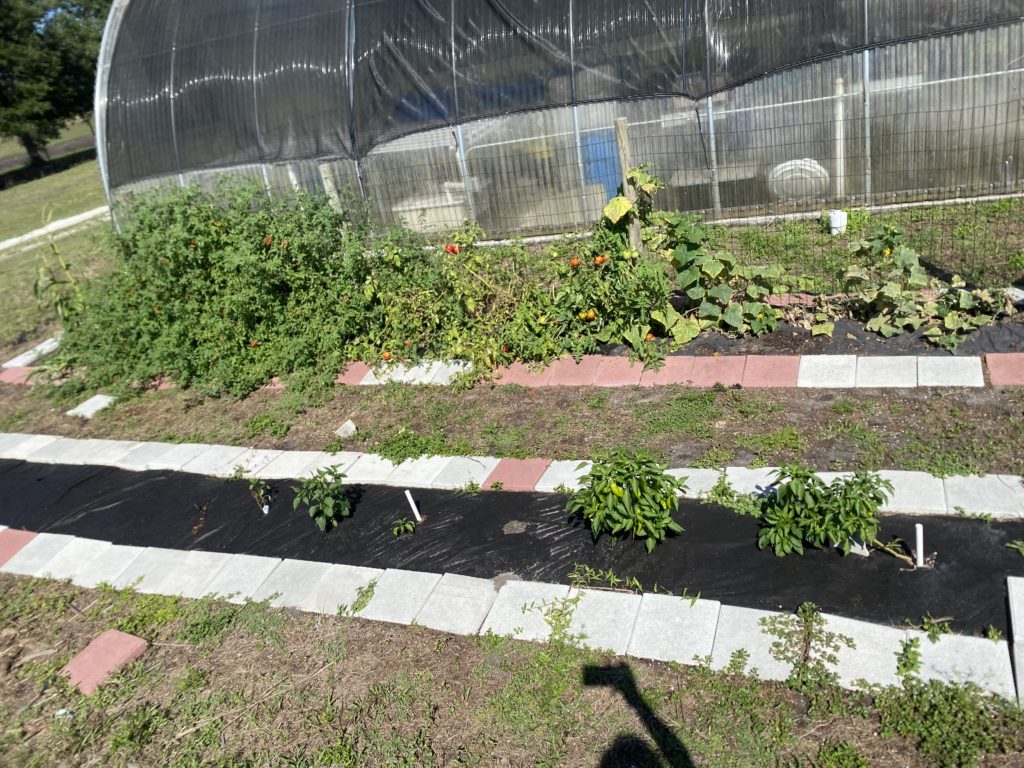
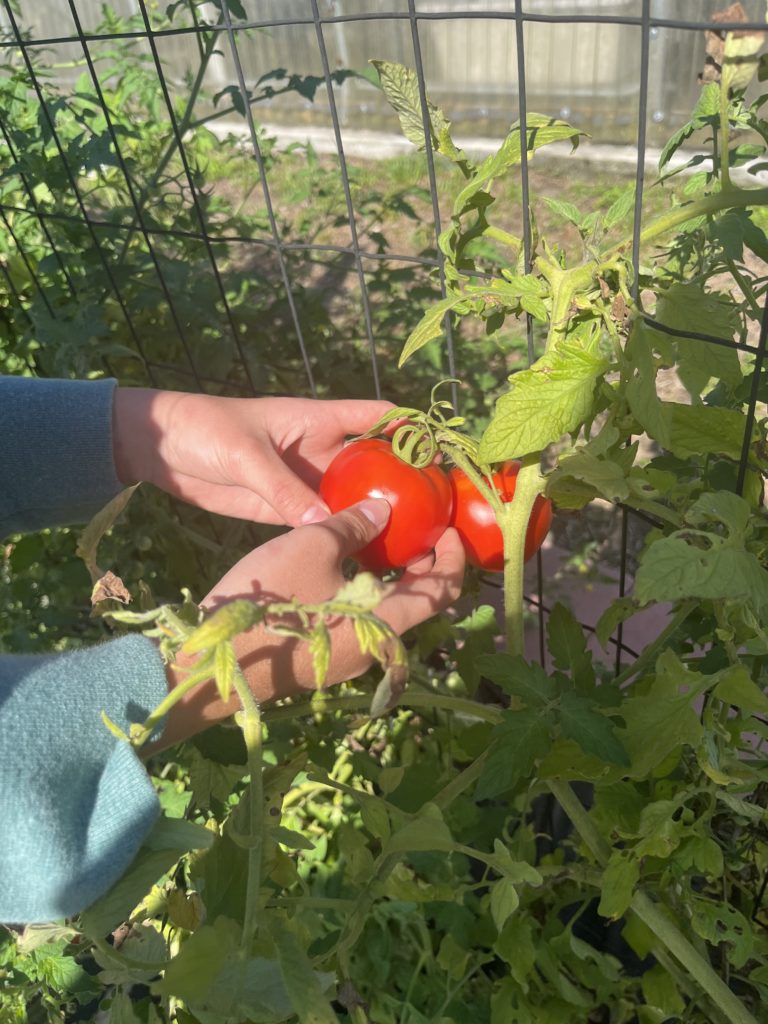
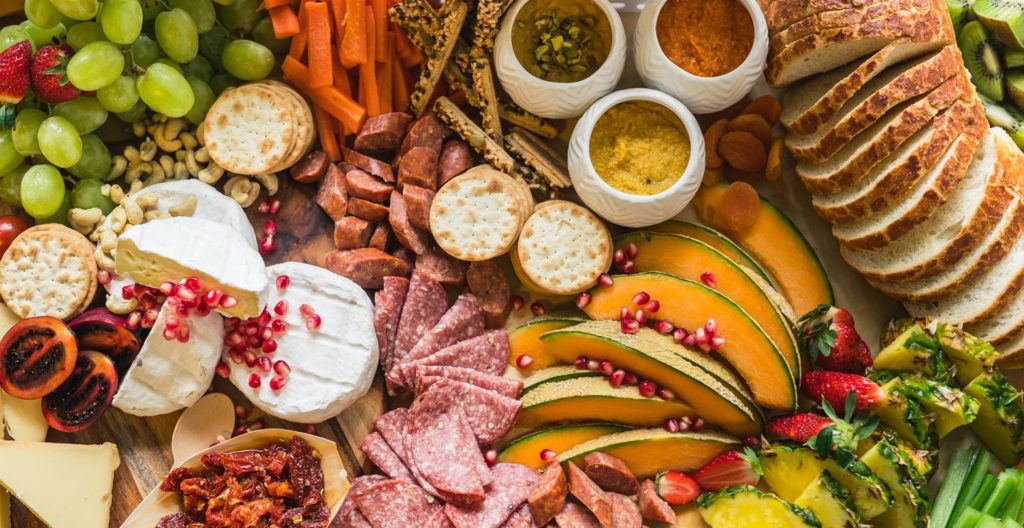
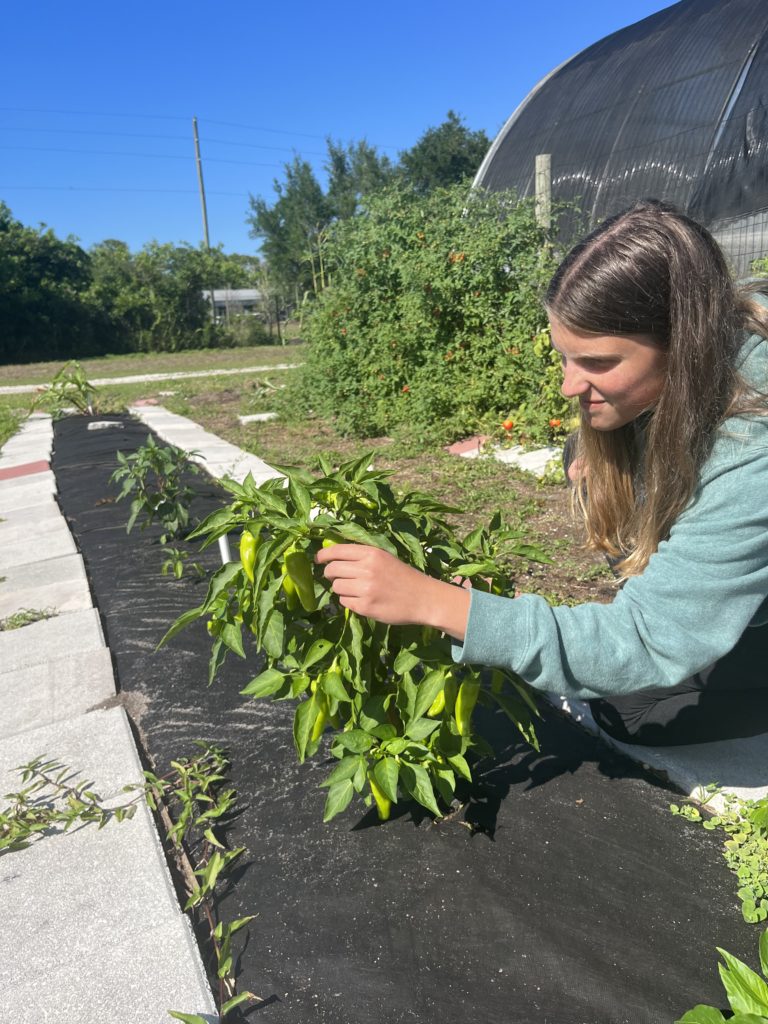
We got most of our vegetables from our school garden.
All of our materials are recycled from previous Solar Oven contestants from our school.
Work Log
| Date | Initials of Team Members | Time done | What was done |
| 3/20/23 | KS, CW, AG | 3:30-4:00pm | Brainstorming food ideas |
| 3/21/23 | KS, ED, AG, CW | 2:30-4:00pm | Brainstorming the ovens design |
| 3/23/23 | KS, ED, AG, CW | 2:30-4:00pm | Finalized menu ideas |
| 3/27/23 | KS, ED, AG, CW | 2:30-4:00pm | Got the box and started painting |
| 3/28/23 | AG, CW | 11:00-11:30am | Continued to paint the oven |
| 3/28/23 | KS, AG, CW, ED | 2:30-4:00pm | Finished painting the oven and started to work on the website |
| 3/30/23 | KS, ED, AG | 2:15-4:00pm | Started putting insulation in the oven and work on the website |
| 4/03/23 | KS | 9:30-9:45am | Worked on the website |
| 4/03/23 | KS, ED, AG, CW | 3:30-4:00pm | Worked on the bottom of the oven |
| 4/04/23 | KS, ED, AG, CW | 2:30-4:00pm | Worked on the flaps |
| 4/05/23 | KS | 3:00-4:00pm | Worked on the website and added more to the oven |
| 4/06/23 | KS, ED, AG, CW | 2:30-4:00pm | Working on the flaps |
| 4/10/23 | KS, CW, AG, ED | 2:30-4:00pm | Worked on the flaps, video, and the materials on the website |
| 4/10/23 | KS | 4:00-5:30pm | Made adjustable stands for the main flap |
| 4/11/23 | KS, ED, AG, CW | 2:30-4:00pm | Made more adjustable stands for the outside flap |
| 4/13/23 | KS, ED, AG, CW | 2:30-4:00pm | Finished adding and making the sides longer with some adjustable devices |
| 4/16/23 | ED, AG, CW | 1:00-5:00pm | Picked fresh fruit for our food |
| 4/16/23 | KS | 8:30-11:00pm | Worked on the video |
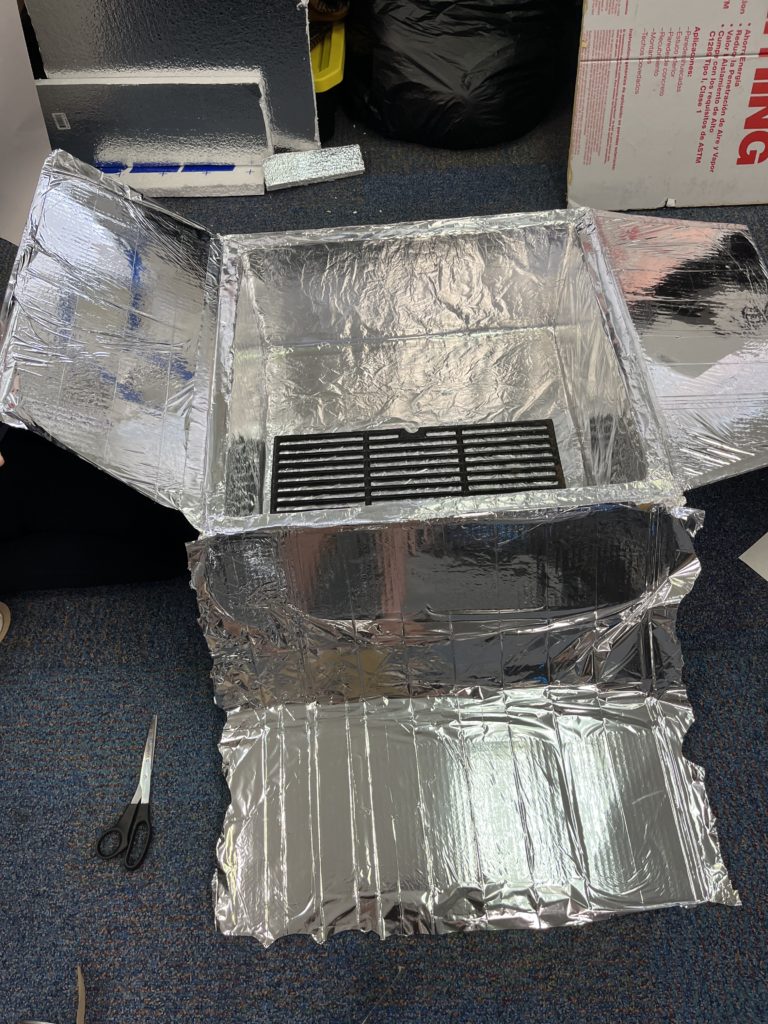
Making the emergency blanket fit on the oven flaps.
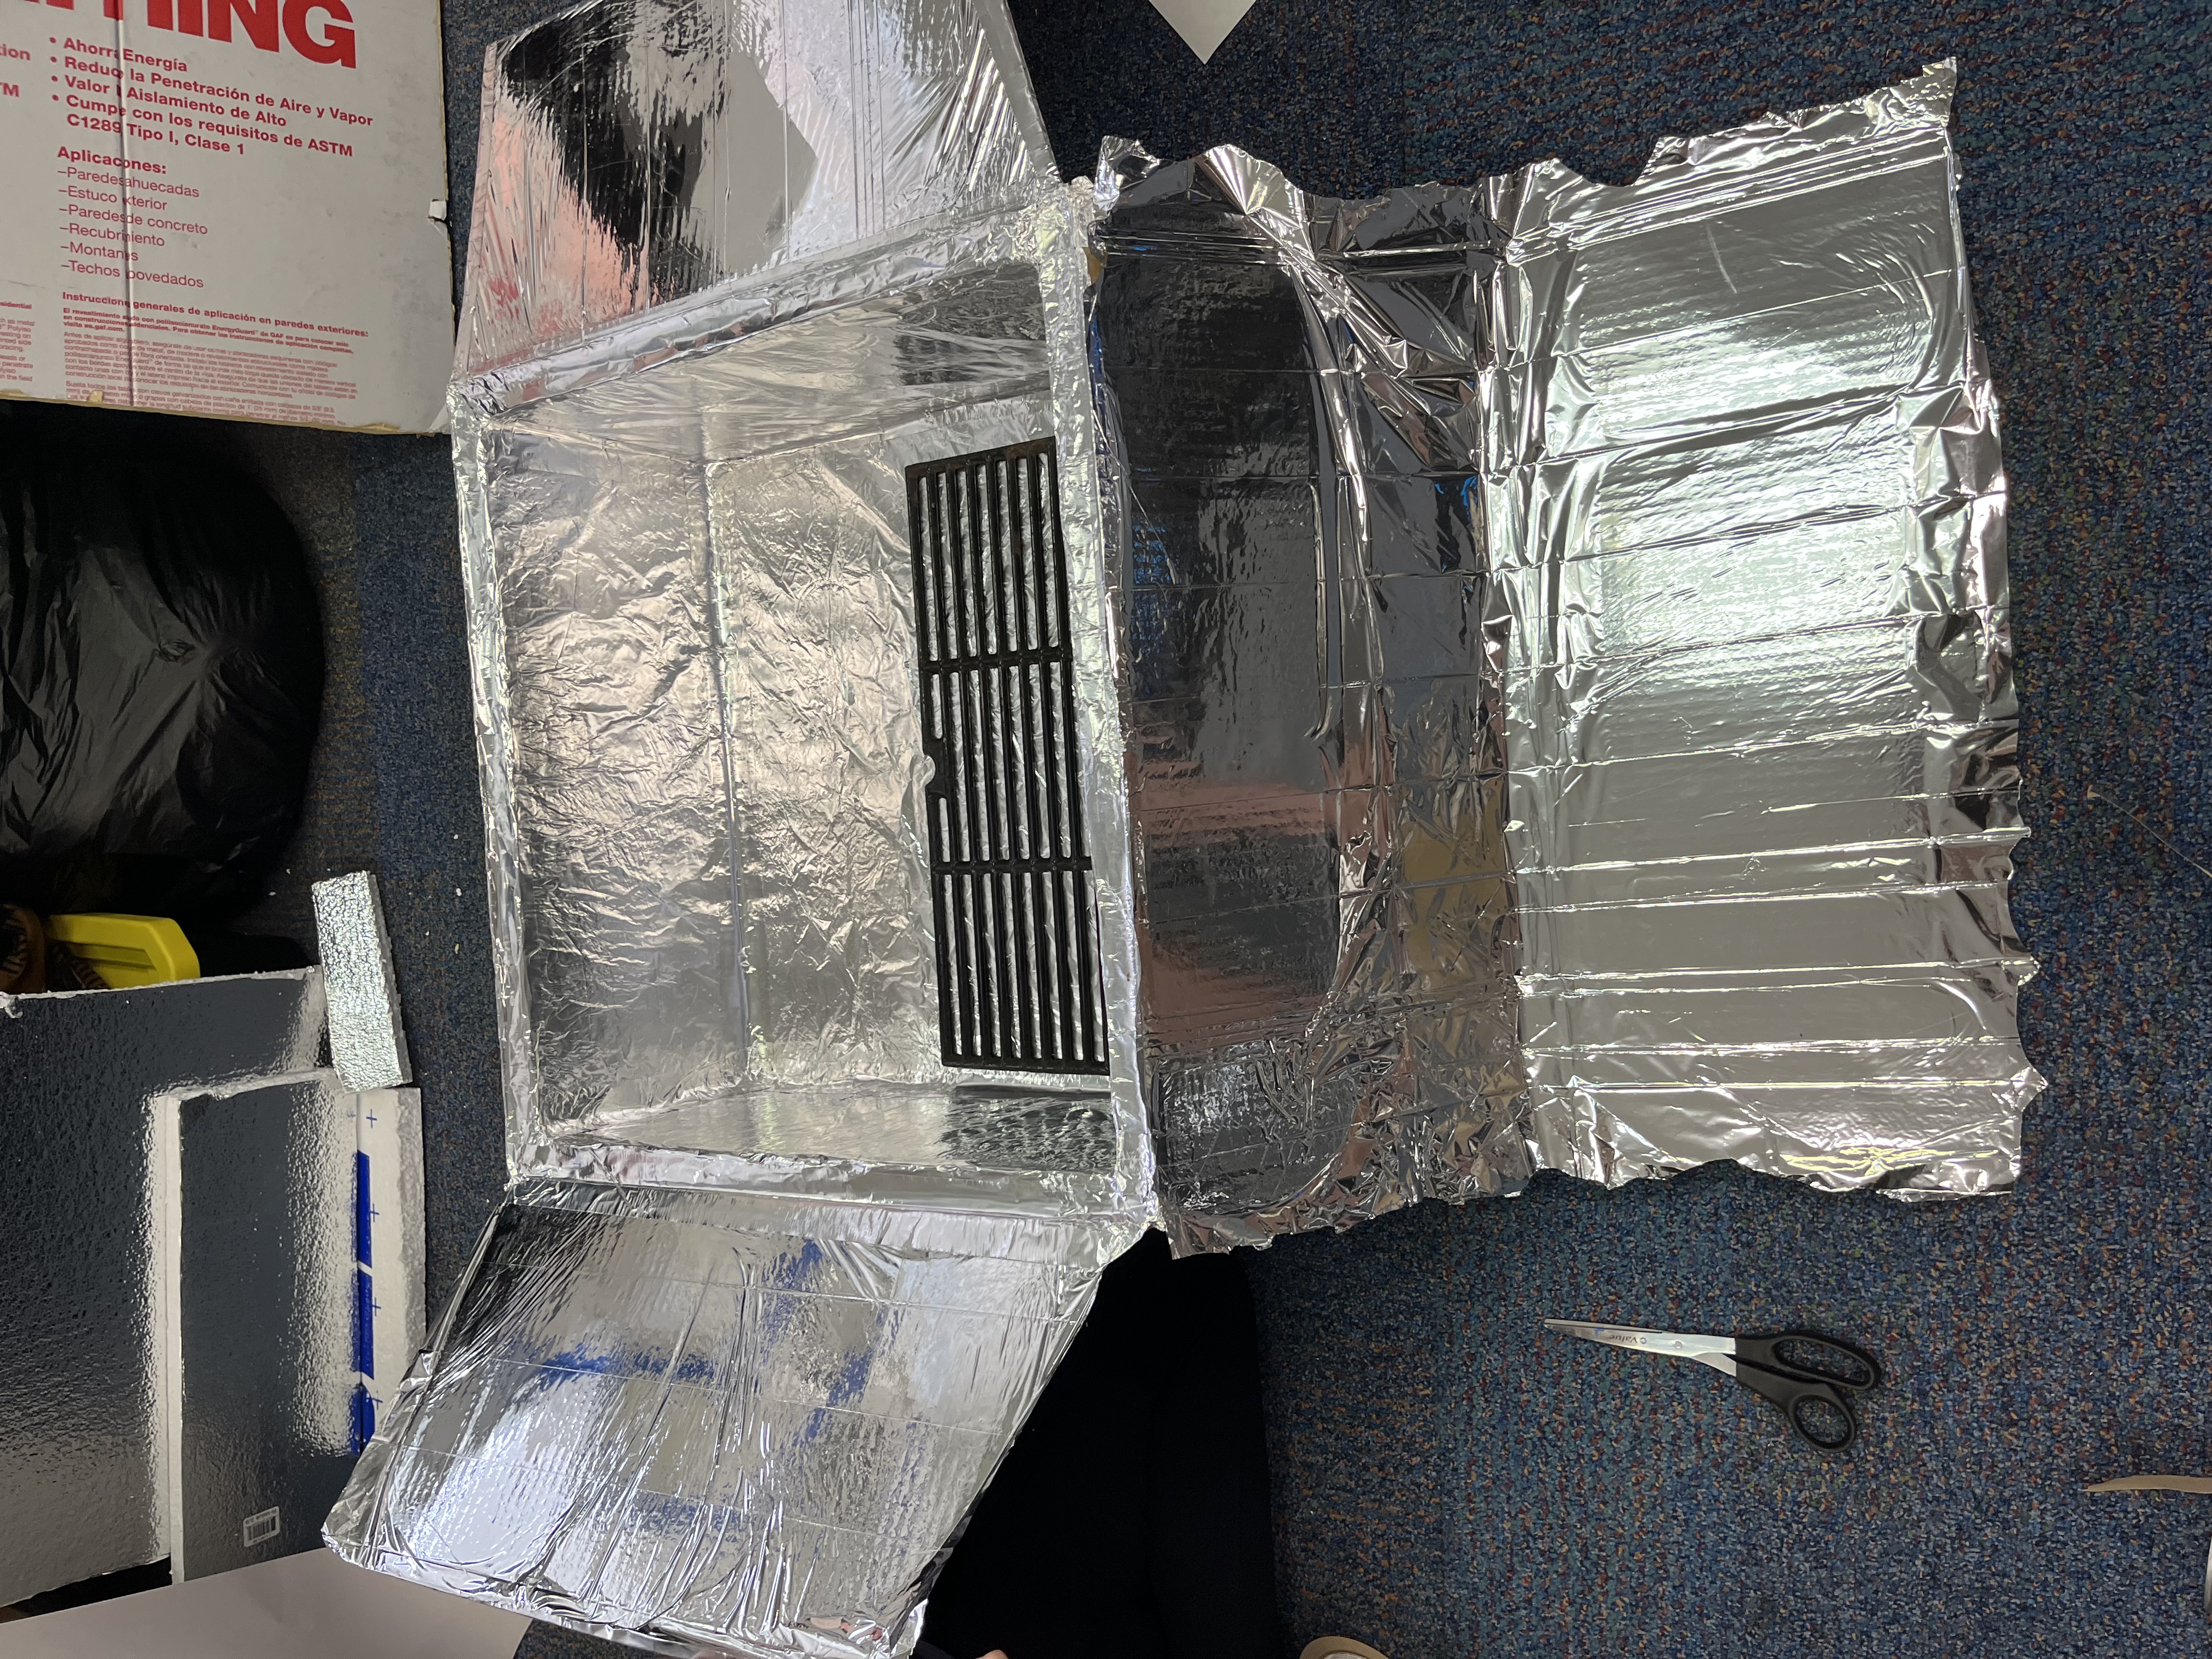
We added more length to the shorter sides to bring in more of the sun’s light.
Materials
-Cardboard box (recycled)
Cardboard (recycled)
-Foam insulation (recycled)
-Emergency blanket (recycled)
-Duck tape (recycled)
-Adhesive glue (recycled)
-Black spray paint (recycled)
-Plexiglass (recycled)
-Insulation tape (recycled)
-Aluminum foil tape (recycled)
-Aluminum foil (recycled)
-Magnifying sheets (recycled)
-Hot glue (recycled)
All of our materials are recycled because we wanted our design to be as eco-friendly and green as possible.
Special Features and the Design Process
Some special features include…
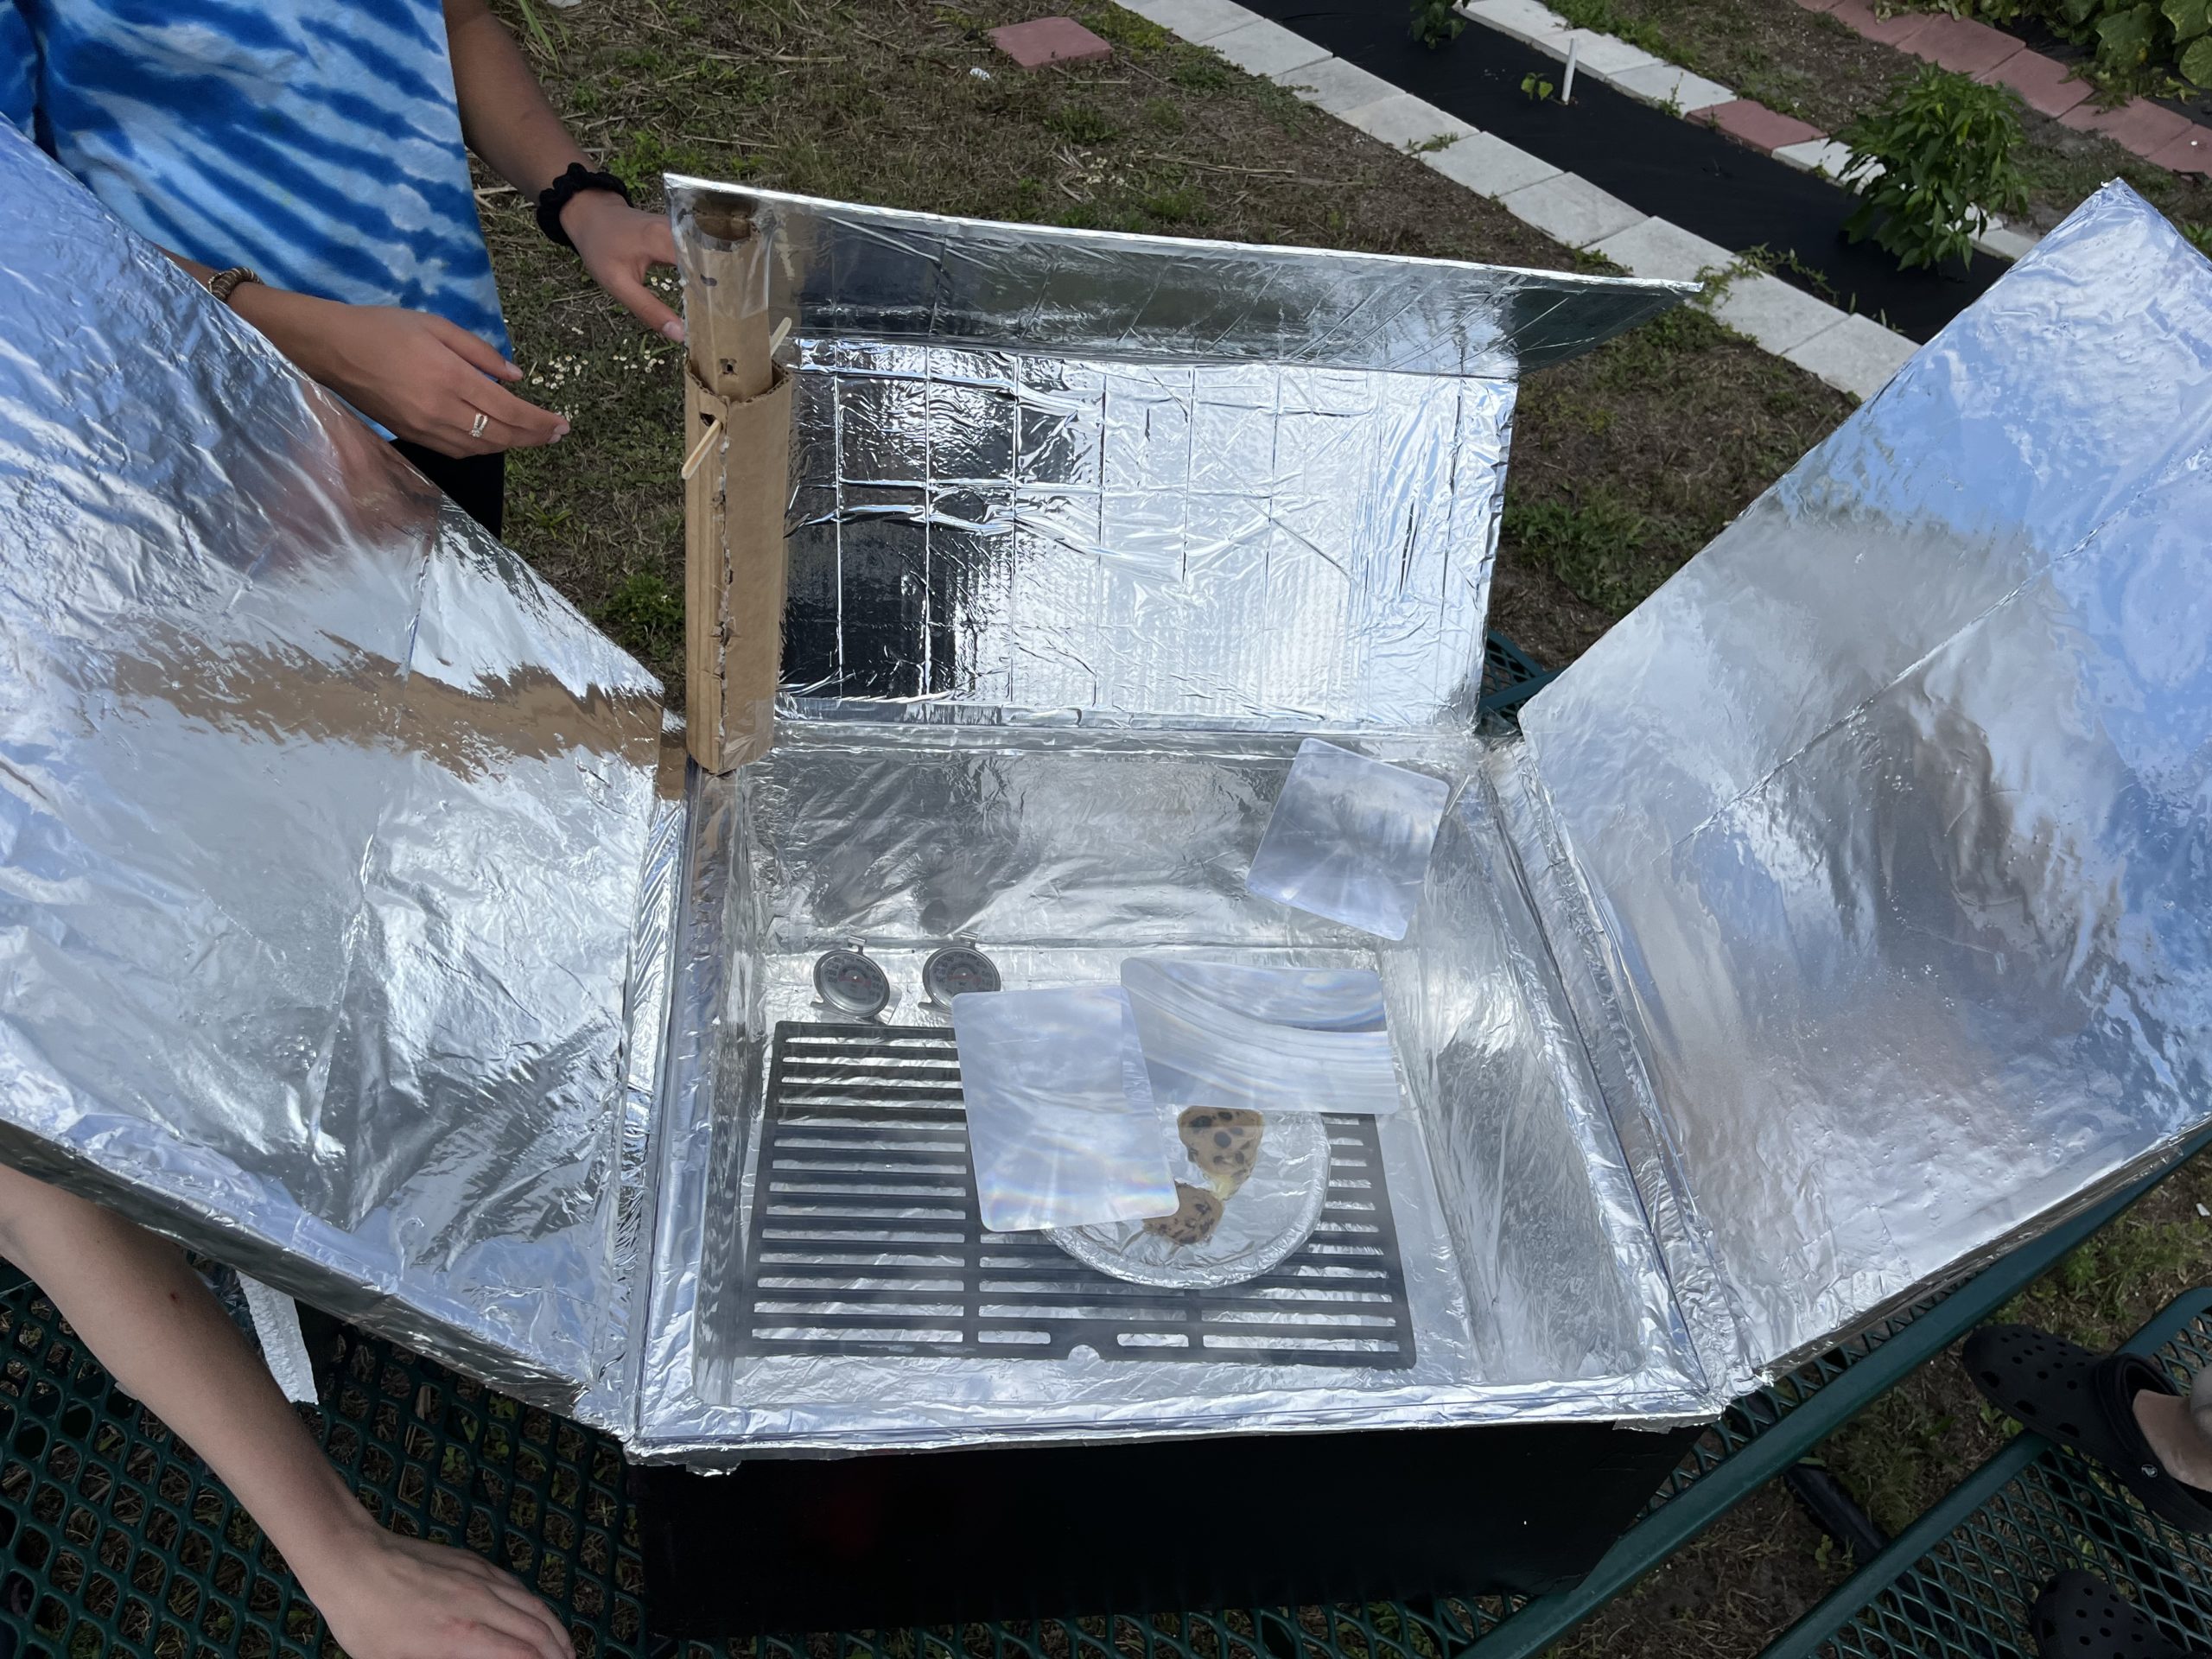
Adjustable Flaps: We made stands for the big flap on the back. It can move at two different places, the base and in the middle. We have the ability to change the angle of the flaps to match where the sun is in the sky while the oven is cooking.
Grill Rack: The grill rack allows us to elevate the dishes our food is cooking in. This makes for better circulation around the dishes and faster heating and cooking.
Magnifying Sheets: The magnifying sheets amplify the sun’s light into the oven and cause there to be more heating.
The Design Process (PLTW Version):
Step 1 – Define the Problem
We looked at the rules and found out all of the things we needed to have.
Step 2 – Generate Concepts
We looked at past oven designs and combinded/innovated the ideas into several different designs that we could have used.
Step 3 – Develop a Solution
We picked the design we thought would channel the most heat into the oven and keep the most heat in.
Step 4 – Construct and Test a Prototype
We gathered the materials we needed and created all of the different parts of the oven, then put the all together.
Step 5 – Evaluate Solution
We tested our design and found all the places where heat might have escaped and fixed them. We also fixed the system we had in place to hld the flaps up and made it more stable.
Step 6 – Present Solution
We will present our solution to the judges at the EnergyWhiz Olympics on April 22, 2023.
Recipes
Drink Me (Alice in Wonderland)
- Boba
- 1 cup water
- 1/4 cup granulated sugar
- 1 Lemon
- 2 tablespoons honey
- 1/2 cup blueberries (fresh or frozen)
- Sun Tea
- Ice
- Fill glass a fourth of the way with ice
- Pour the syrup over the ice until a good covering on the bottom
- Then add club soda on top stopping a short distance from the top
- Pour the Half & Half on top of the drink
- Decorate with whip cream and add a cherry on top
Tiana’s Key Lime Waffle
- Flour-2 cups
- Baking Powder-4 teaspoons
- Sugar-2 tablespoons
- White sugar-2 tablespoons
- Eggs-2
- Butter-2 tablespoons
- Milk-1 ½ cup
- Butter-⅓ cup
- Salt-1 teaspoon
- Vanilla Extract-1 teaspoon
- Graham Crackers-⅔ cup
- Heavy Cream-2 cups-
- Sweetened Condensed Milk -1 can
- Lime juice-1/2 cup
- Blueberries
- In a large bowl, mix together flour, salt, baking powder and sugar; set aside. Preheat waffle iron to desired temperature.
- In a separate bowl, beat the eggs. Stir in the milk, butter and vanilla. Pour the milk mixture into the flour mixture; beat until blended.
- Ladle the batter into a preheated waffle iron. Cook the waffles until golden and crisp.
- Beat heavy whipping cream in bowl till stiff peaks form.
- In separate bowl mix together sweetened condensed milk and lime juice
- Fold the lime mixture into whipped cream
- Crush graham crackers and add coconut shreds and add small amount of butter to join together
- Place 1 waffle on bottom and add layer of cream.
- Top with another waffle and make it look pretty with lime wedges, blueberries and whipped cream.
https://letsdishrecipes.com/key-lime-pie-mousse/
Remy’s Ratatouille
- Egg plants-2
- Roma tomatoes-6
- Yellow squash-2
- Zucchinis-2
- Olive oil-2 tablespoons
- White onion-1
- Cloves garlic-4
- Red bell pepper-1
- Yellow bell pepper-1
- Salt-1 teaspoon
- Freshly ground black pepper-1
- Crushed tomatoes-28 oz
- Fresh basil-2 tablespoons
- Minced garlic-1 teaspoon
- Parsley-2 tablespoons
- Thyme leaves-2 teaspoons
- Salt-1 teaspoon
- Black pepper-1
- Olive oil-4 tablespoons
- Parmesan cheese- 1/2 cup
- Using a sharp knife or a mandoline, slice the eggplant, tomatoes, squash, and zucchini into approximately ¹⁄₁₆-inch (1-mm)-thick rounds, then set aside.
- Make the sauce: Heat the olive oil in a 12-inch (30-cm) oven-safe pan over medium-high heat. Sauté the onion, garlic, and bell peppers until soft, about 10 minutes. Season with salt and pepper, then add the crushed tomatoes. Stir until the ingredients are fully incorporated. Remove from heat, then add the basil. Stir once more, then smooth the surface of the sauce with a spatula.
- Arrange the veggies in alternating slices, (for example, eggplant, tomato, squash, zucchini) on top of the sauce, working from the outer edge to the center of the pan. Season with salt and pepper.
- Make the herb seasoning: In a small bowl, mix together the basil, garlic, parsley, thyme, salt, pepper, and olive oil. Spoon the herb seasoning over the vegetables.
- Cover the pan with foil and bake for 40 minutes. Uncover, then bake for another 20 minutes, until the vegetables are softened.
- Decorate and garnish with parmesan cheese.
- Serve hot as a main dish and Enjoy
https://tasty.co/recipe/ratatouille
Hercules’ Couscous Salad
- Couscous-one packet
- Salt-1 teaspoon
- Butter-teaspoon
- Pepper-1 teaspoon
- Red chili-1 teaspoon
- Garbanzo beans-can
- Coriander- sprinkle
- Feta cheese-a crumble
- Tomato-1
- Cucumber-1
- Onion-1
- Get packet of cous cous and bring water to boil
- Add salt and cous cous
- Cover with a lid and let poof up
- Once water is gone, take out of heat
- Floof up with a fork and add butter
- Add seasoning (salt, pepper, pinch of red chili)
- Add beans (garbonzo)
- Add vegetables
- Put some parsley and feta cheese on top
Thank you!