
The Solar Kings
Event Location: Cocoa-FL
Competition: Junior Solar Sprint
Division: 4-6 (JSS Green)
School: NSU University School
Team Name: The NSU Solar Kings
Project Name: The NSU Solar Kings
Team Size: 3
Team Information
Car Name
| Car Name: The Tech Inferno |
| Team Name: The Solar Kings |
| School Name: NSU University School |
| Team Members Names: Liam C, Adam T, |
Design Documentation
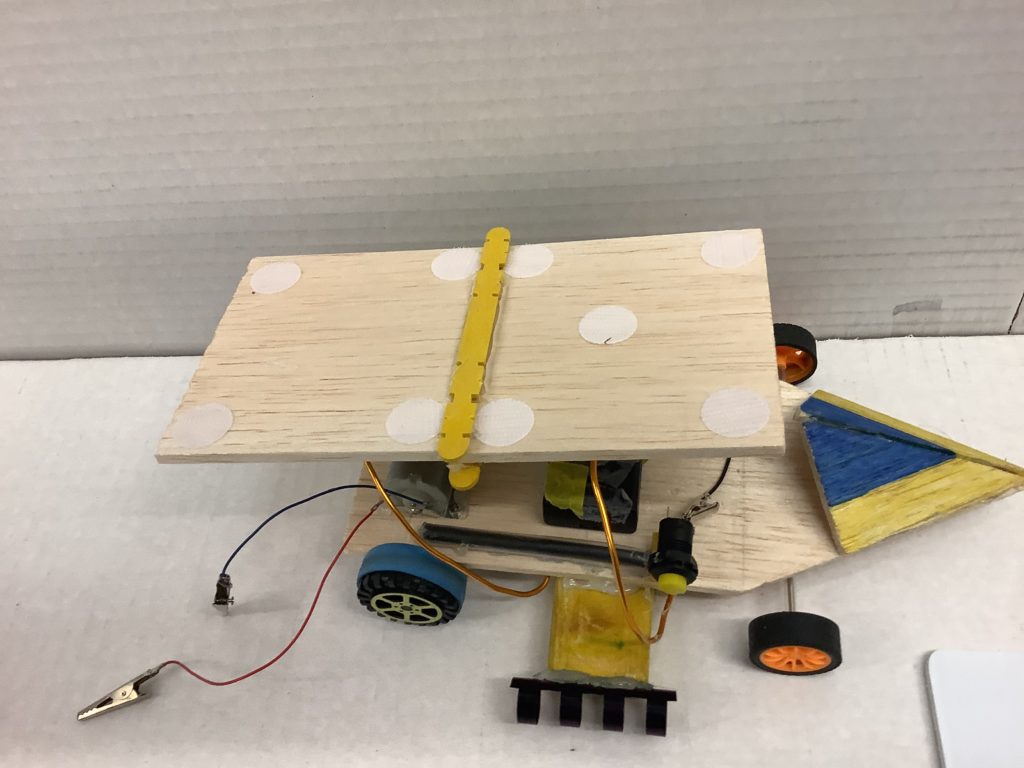
Top View without Solar Panel
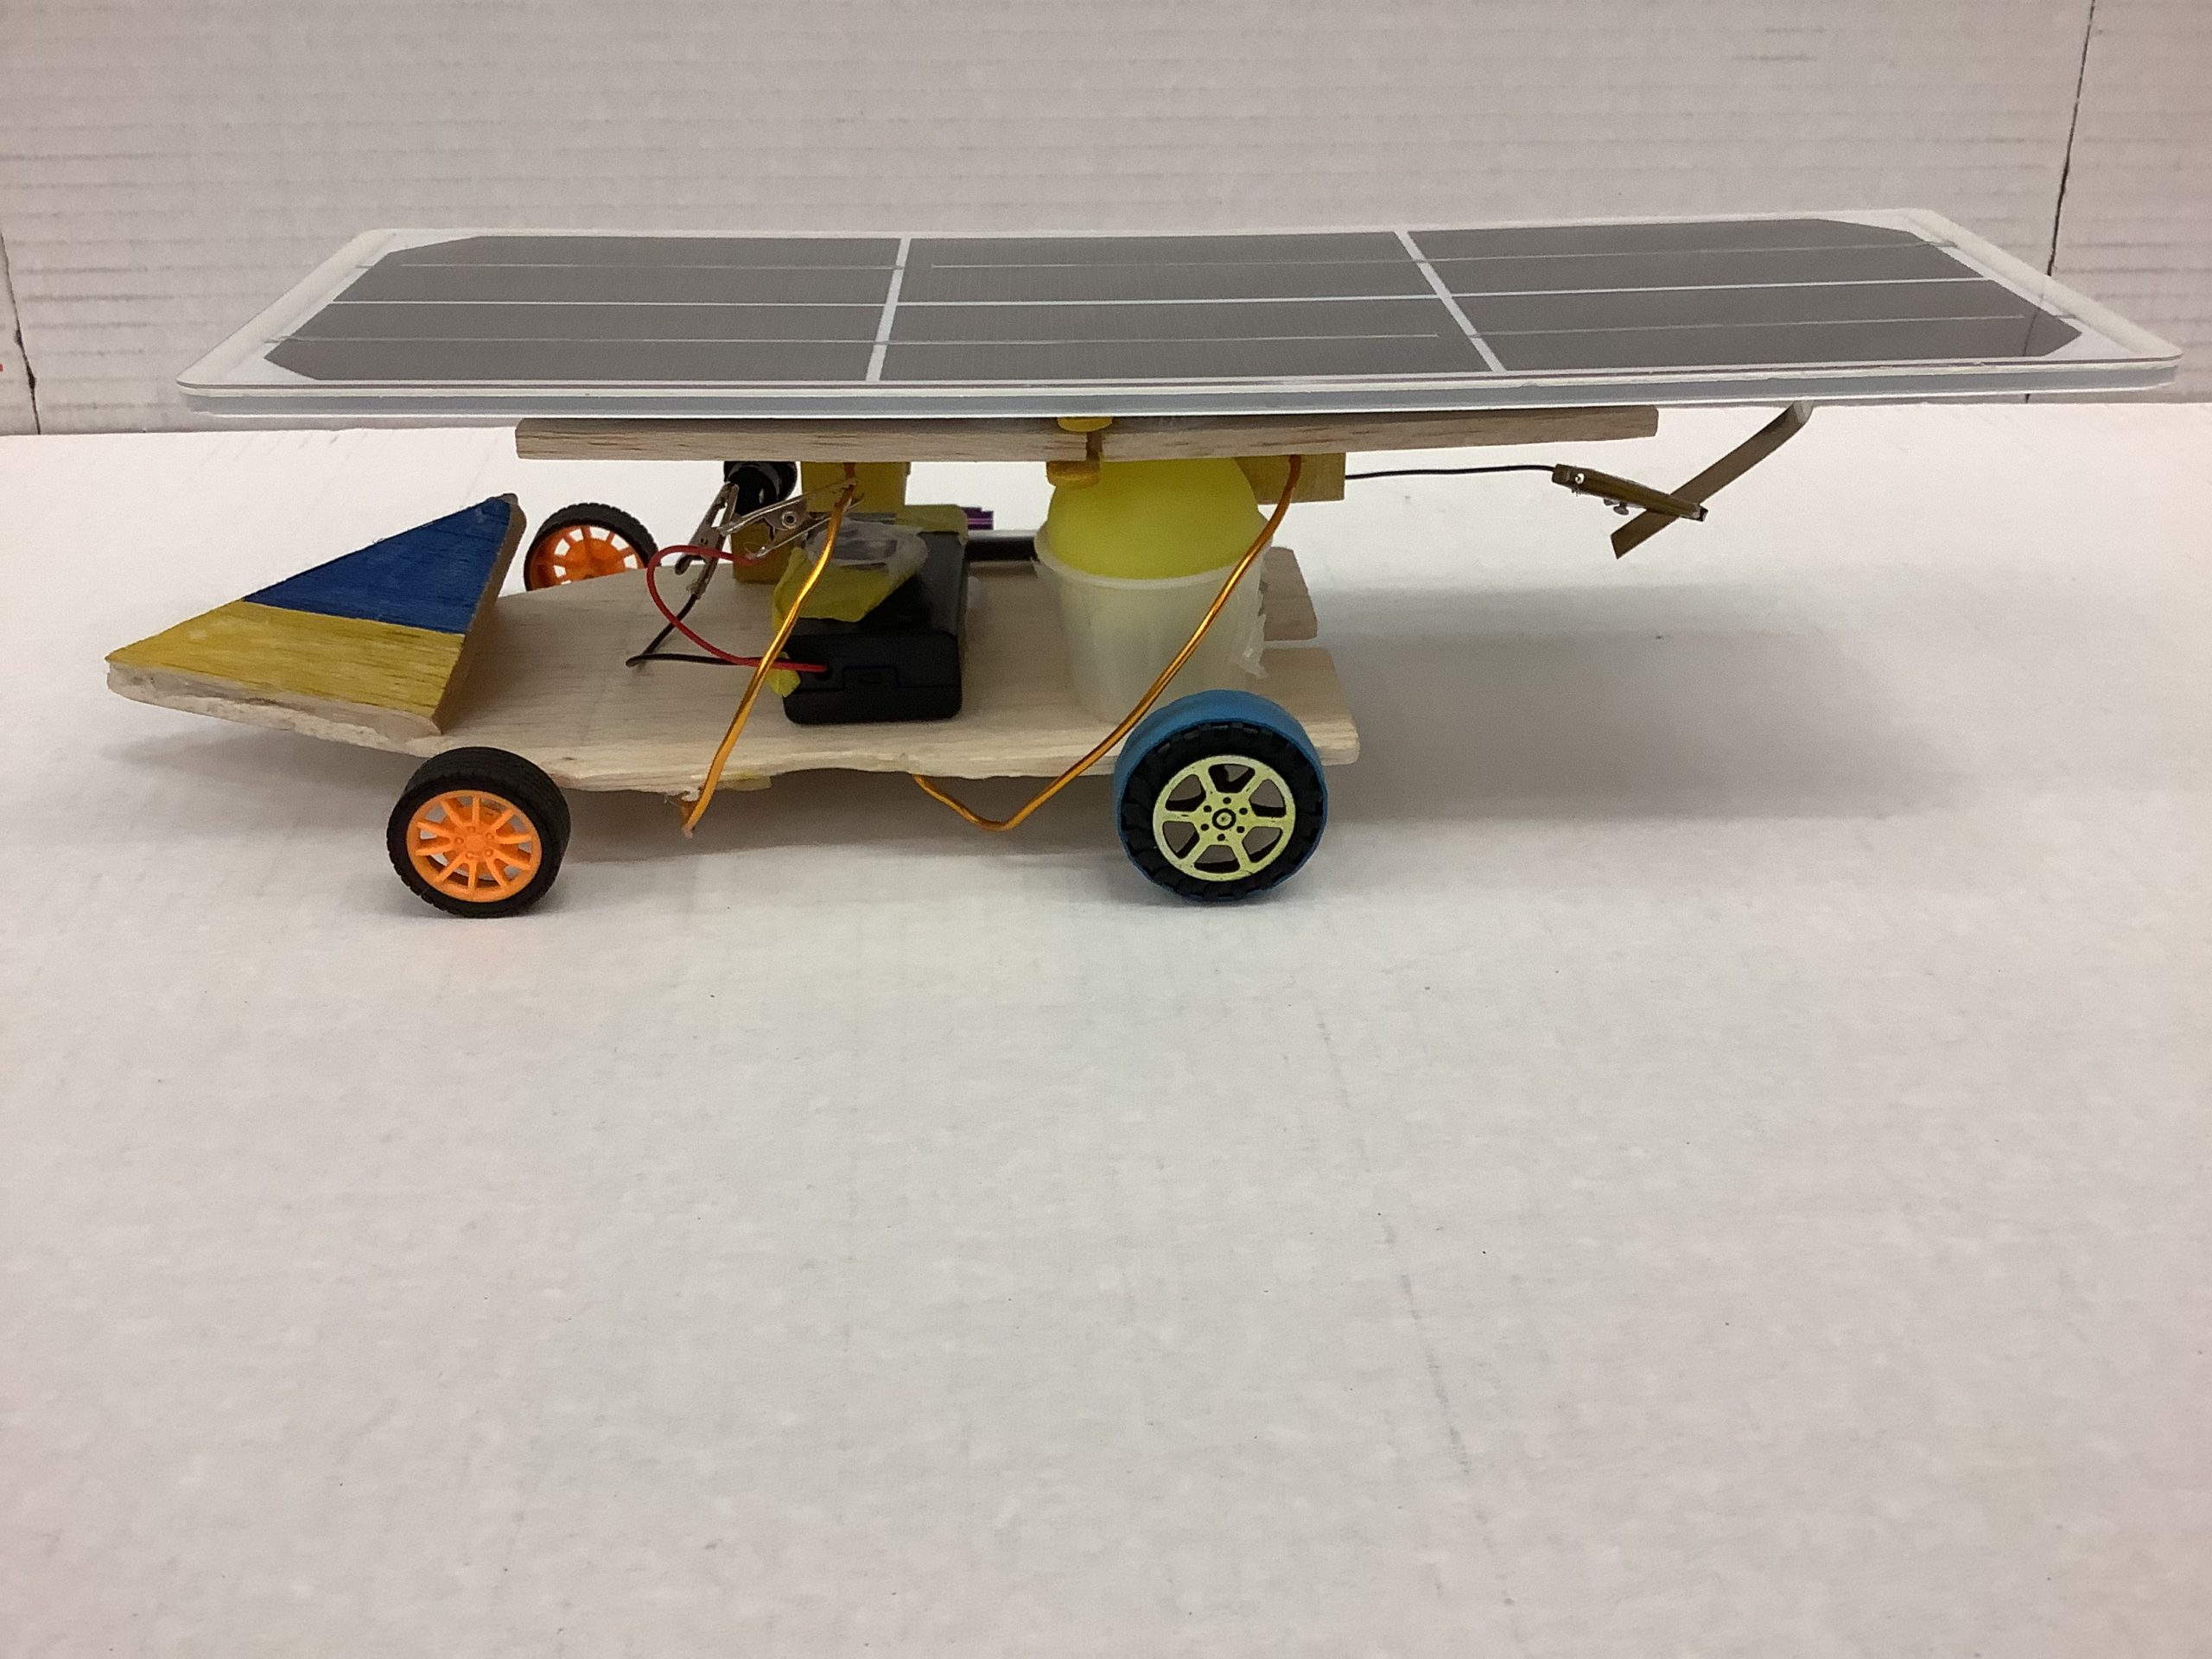
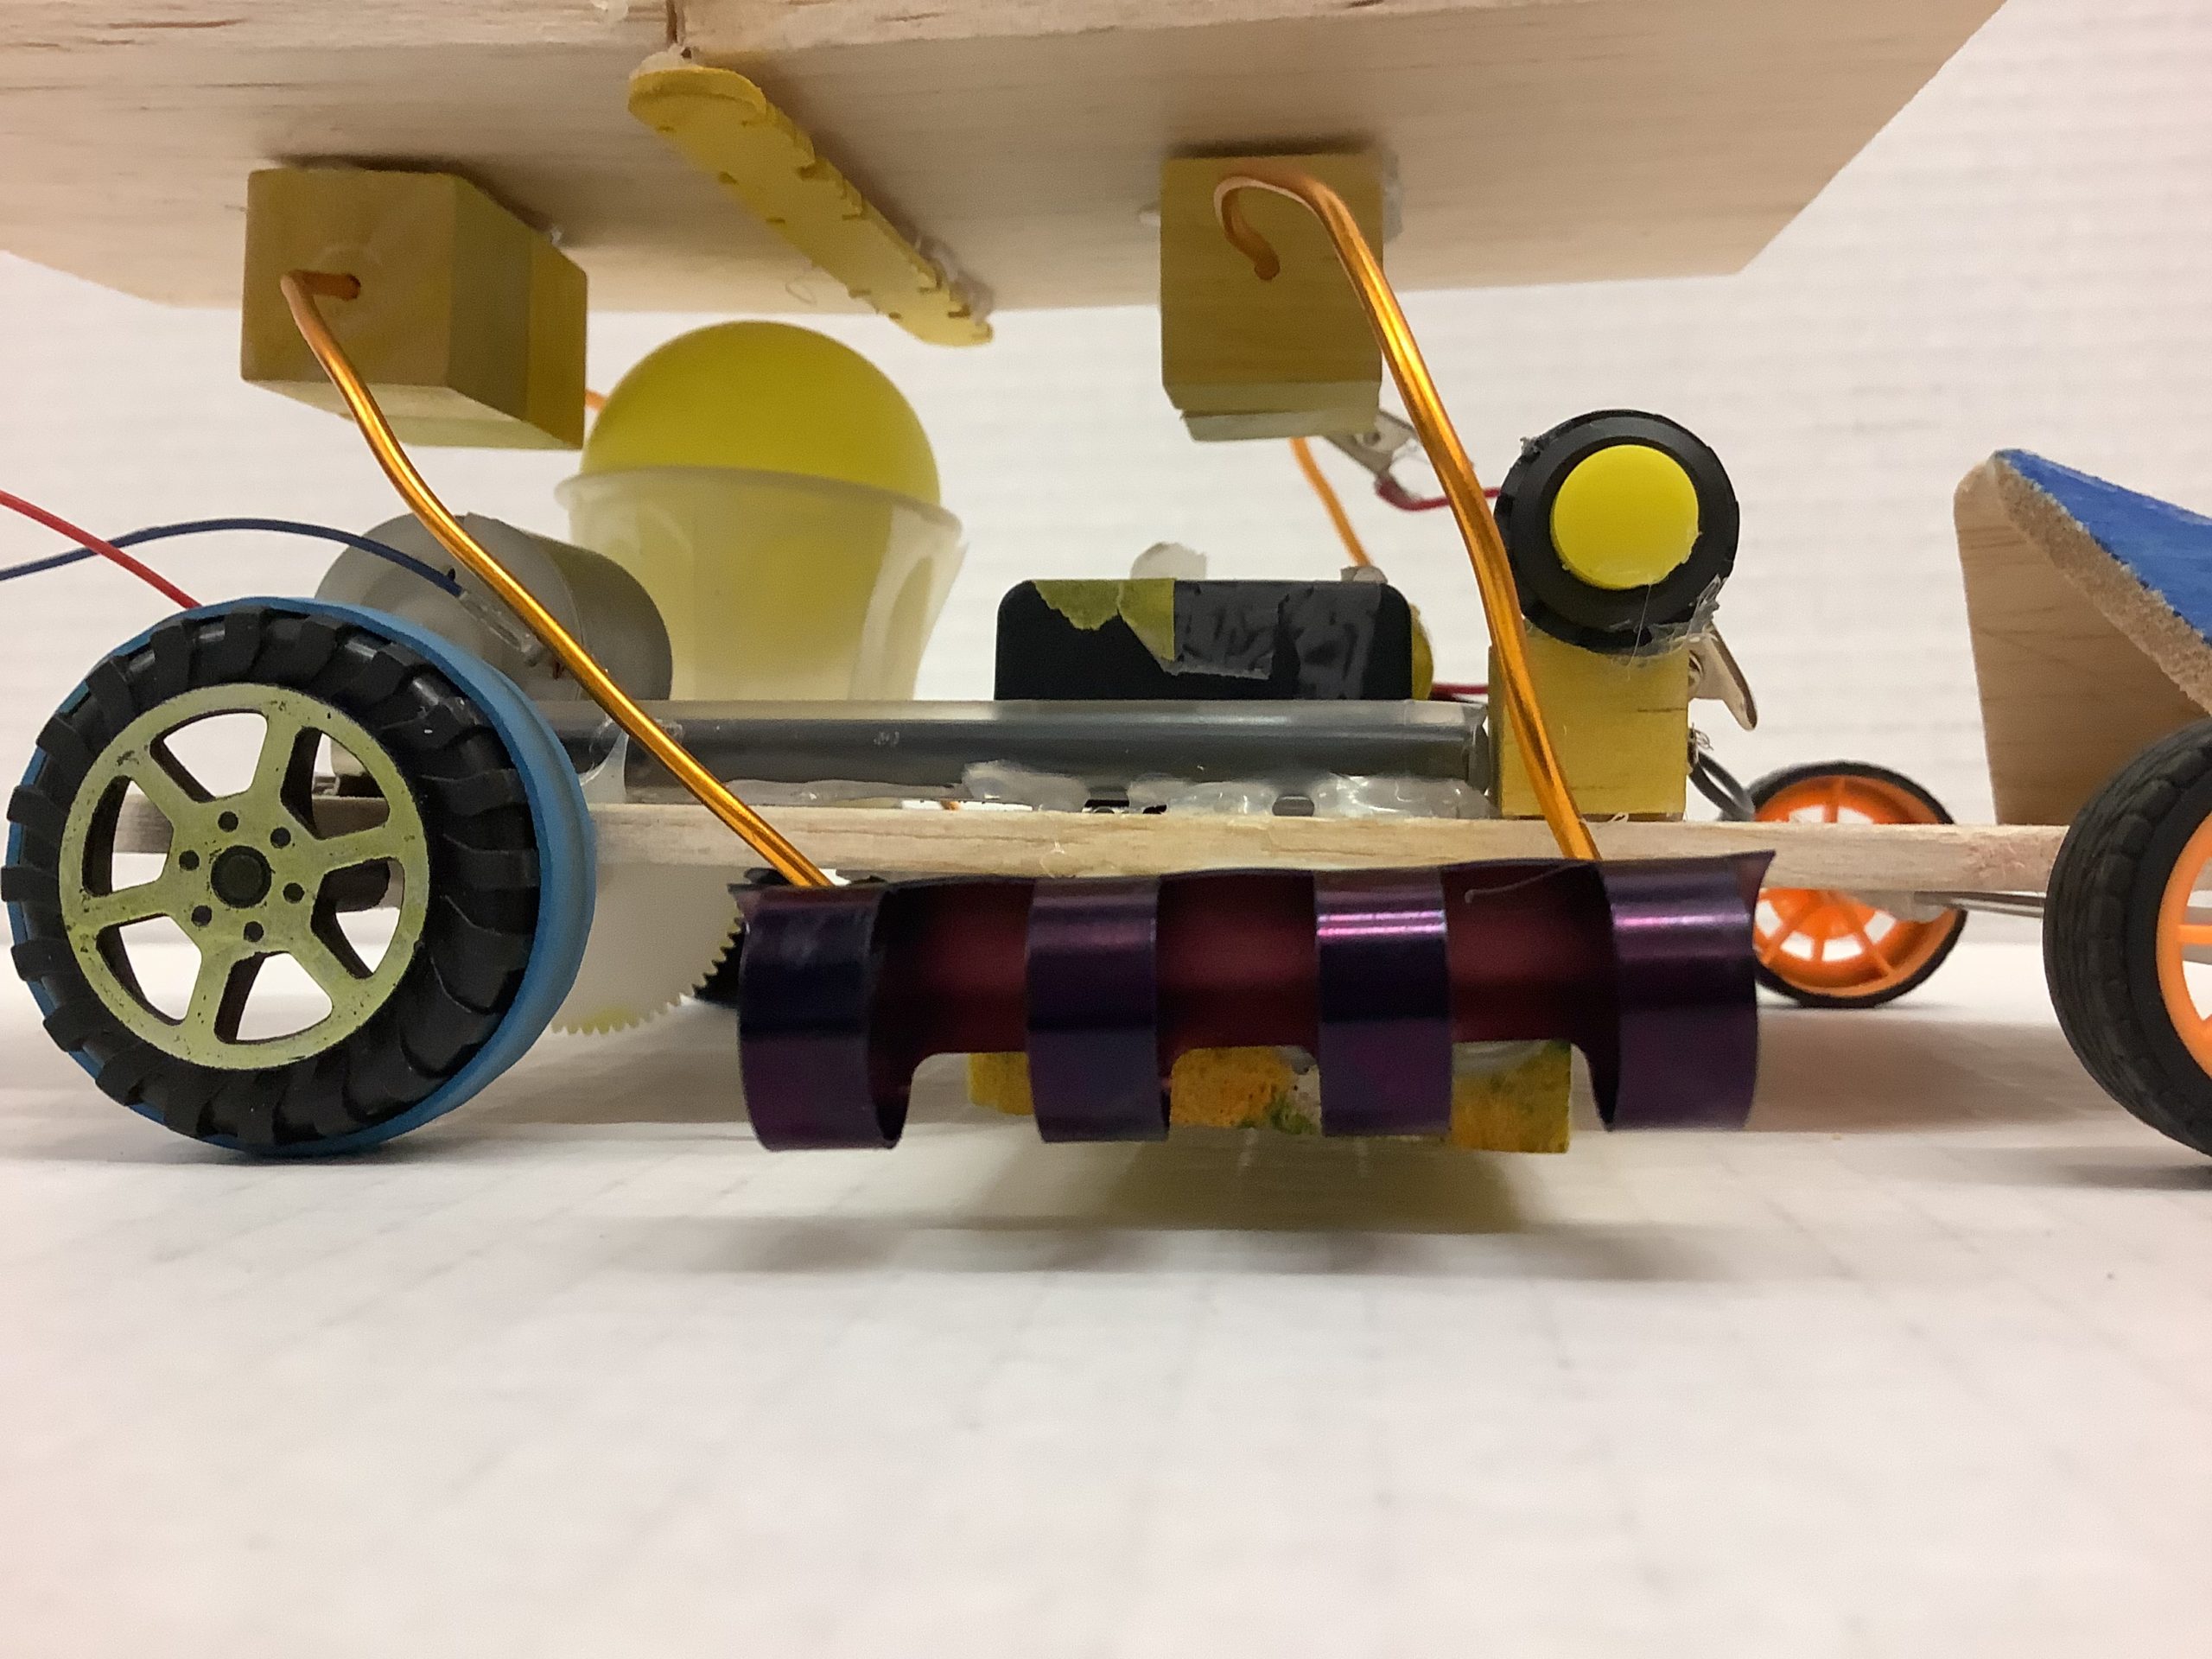
Side View #1

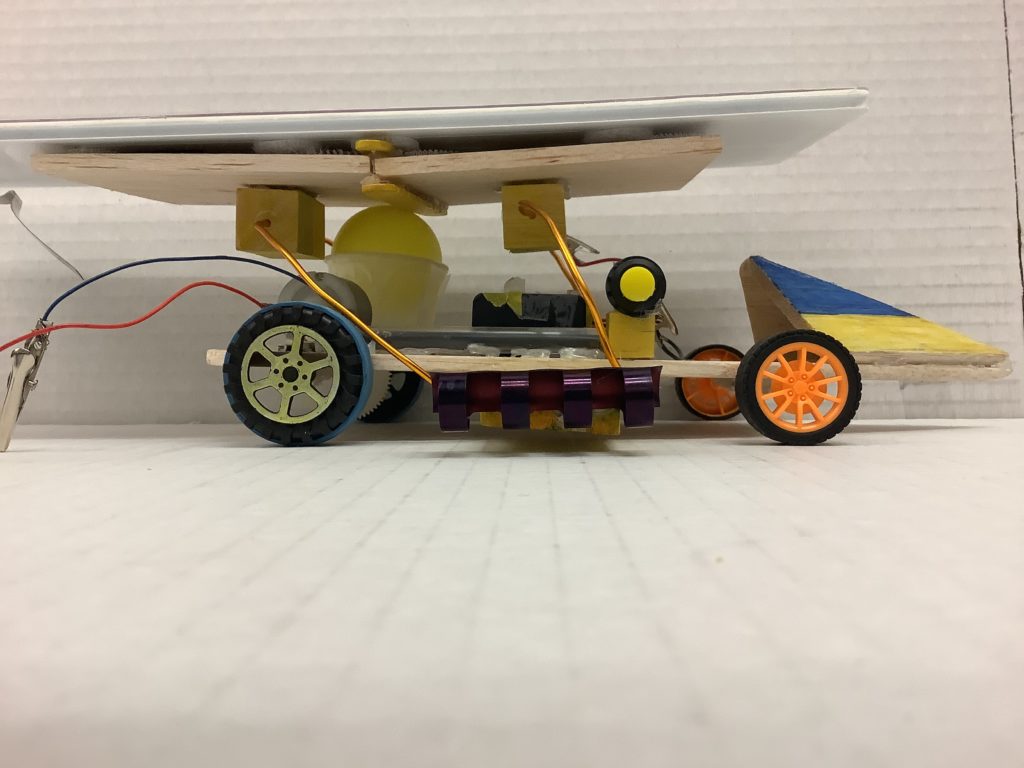
Side View #2
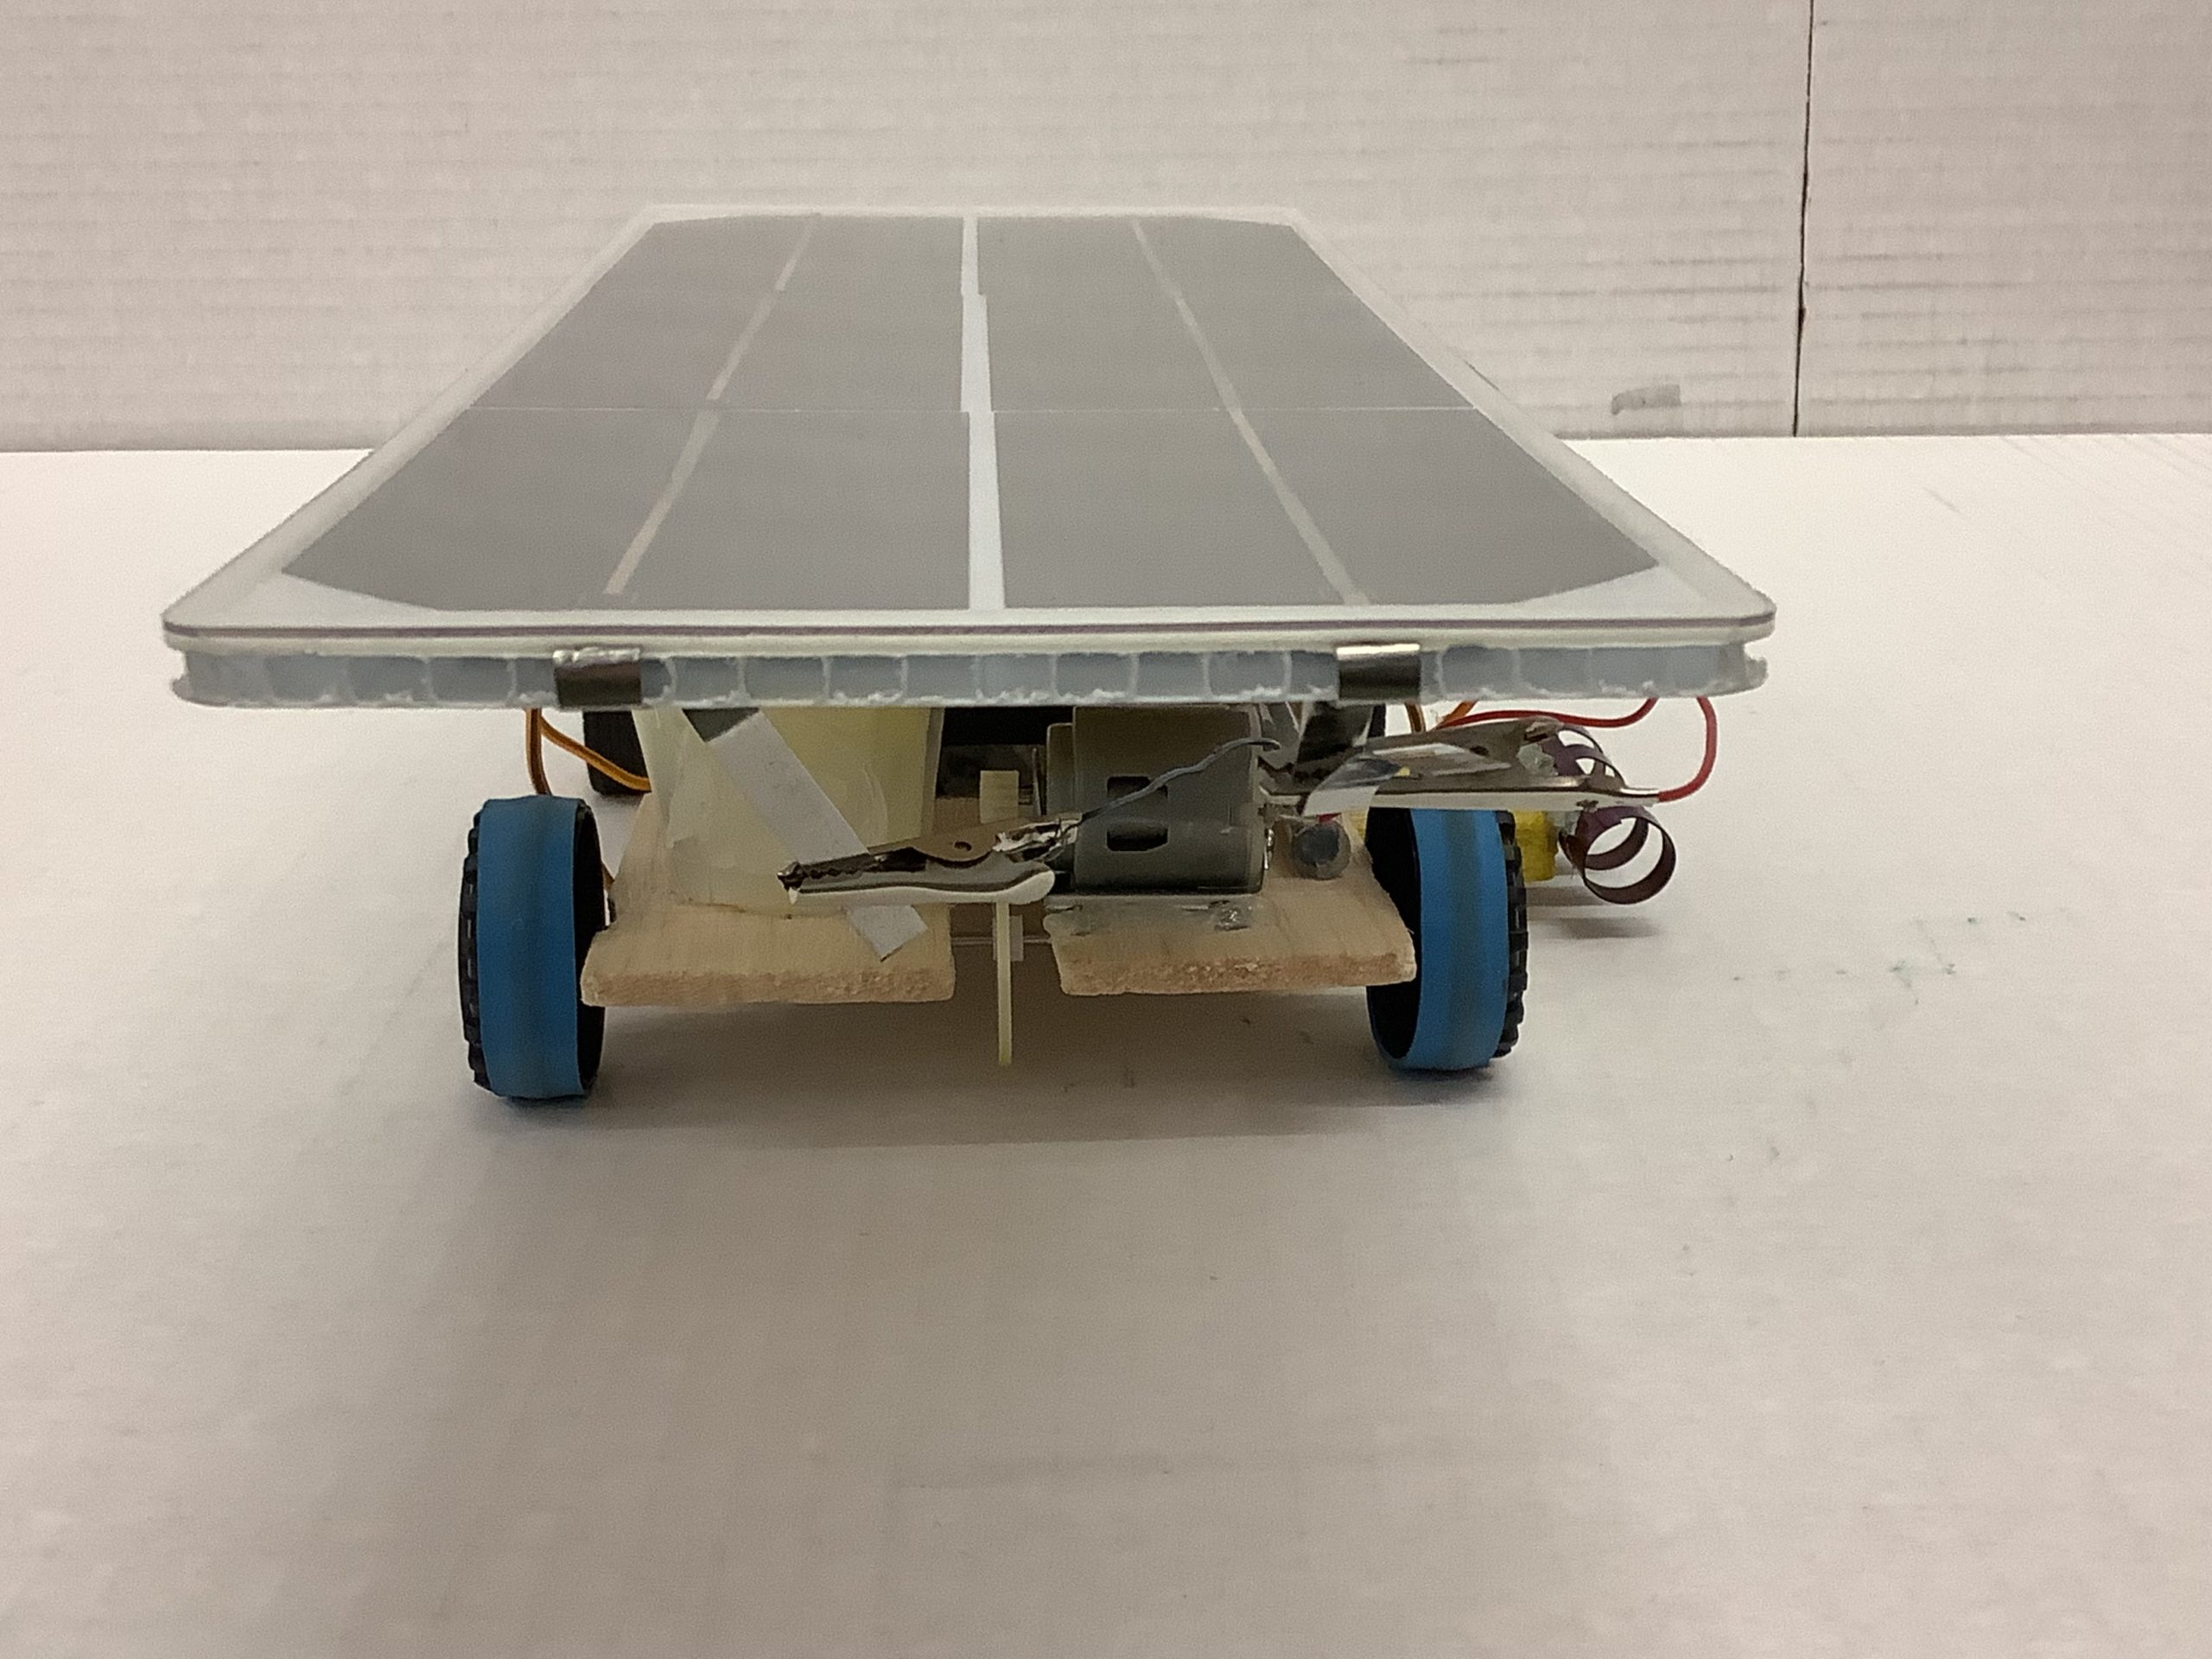
Back View
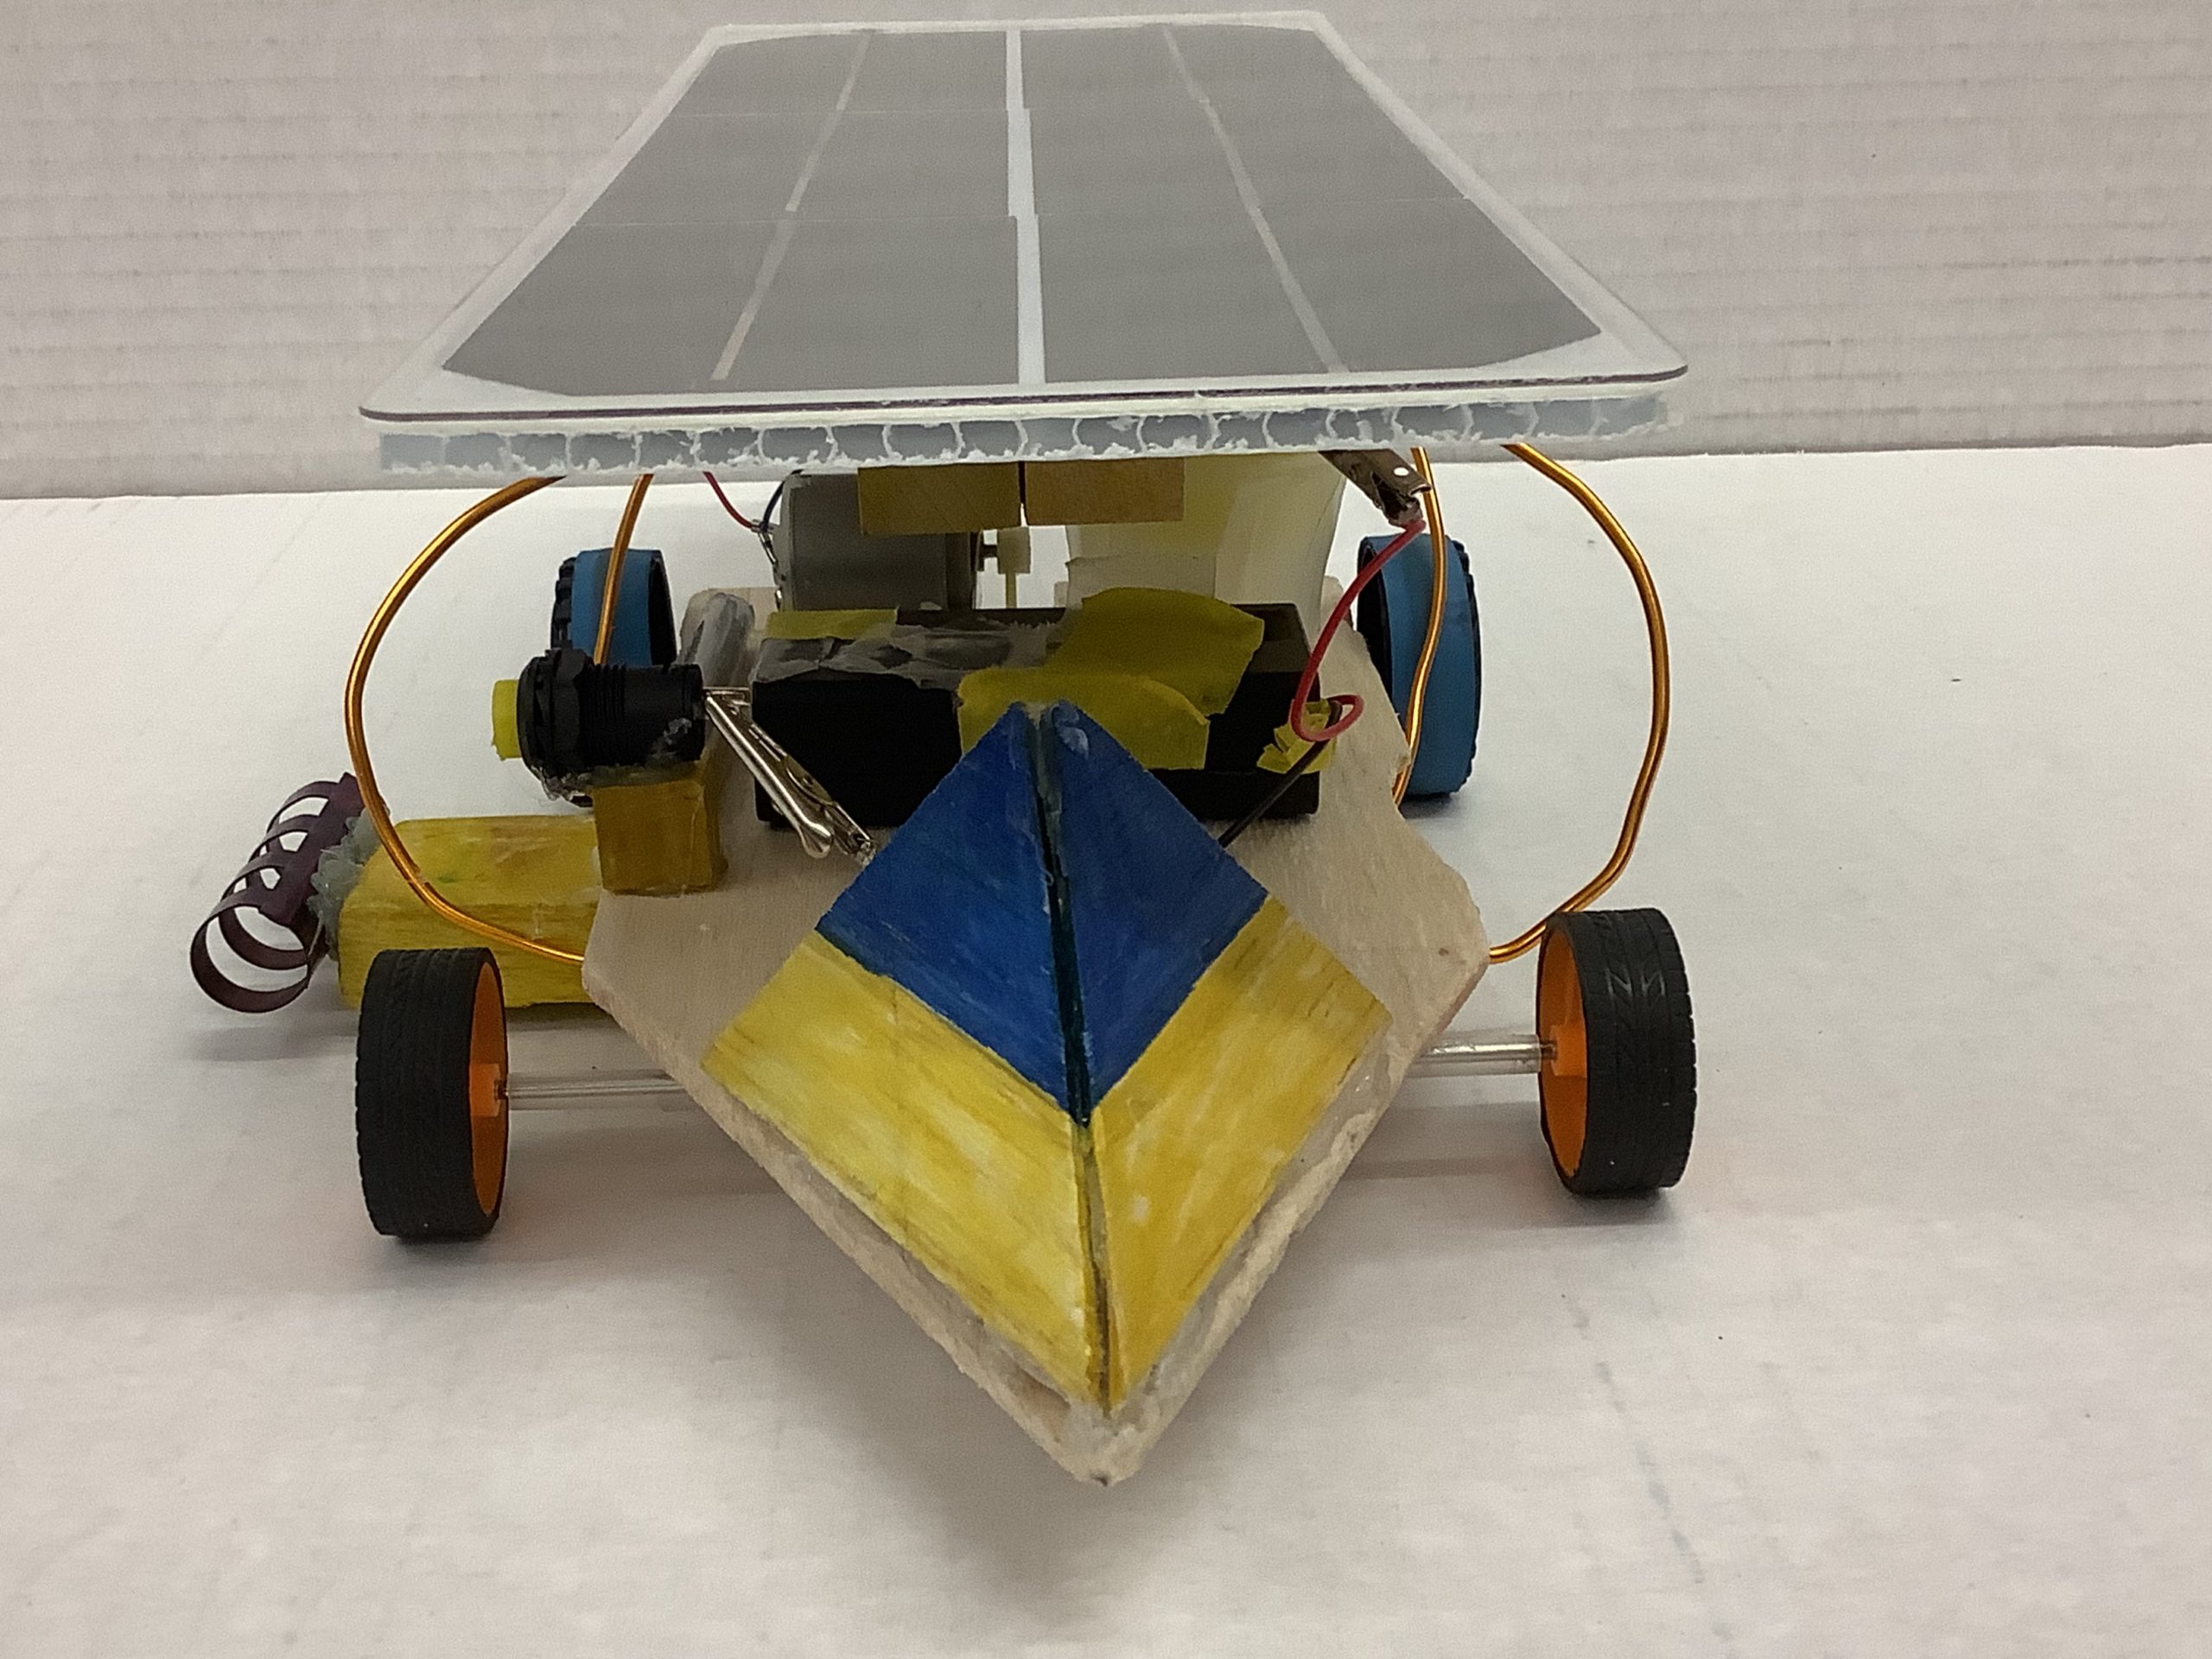
Front View
Special Features of Car
Project Log
| Date | Hours | Tasks / Work Done | Obstacles Encountered | Modifications to Car |
| 8/23 | 1 | We came up with ideas for what our car would look like and began gathering materials. | Since it was our first time building a solar car, it was not easy to come up with a plan. | |
| 8/30 | 1 | We cut out the body and made a place to store the ball. We chose the panel, motor, wheels and axles we are going to use. | It was hard to get the body straight. We also had to make a lot of decisions about materials to use. | The chassis was cut out |
| 9/6 | 1 | We put our wheels and a gear on the axles. We made lines straight lines for the axles using a T-square then attached the axles. We also measured the motor. | The axles fell off after we put them on. | We added the axles to the car body. |
| 9/20 | 1 | Our axles came off but we were able to rebuild them and attach them again. | We added extra glue to the axles so they would not fall off anymore. | |
| 9/27 | 1 | We put the motor on the car. | The gears did not line up at first. | Motor added to the car body. |
| 10/18 | 1 | We attached the alligator clips to the battery wires then attached the battery pack to the car. | It was hard to put the alligator clips on. We should have done the circuit before gluing on the motor. | Battery and wiring added to the car body. |
| 10/25 | 1 | The wire connection broke so we fixed them and made the car run again | Wires separated and we had to fix them. | We taped the wires down so they would not come apart again. |
| 11/15 | 1 | We connected wires to the motor so we could run the car. | Although we fixed the wires last week, they came apart again. Very frustrating. | We connected wires again. |
| 11/29 | 1 | We tested our car and it worked. | We were starving and it was hard to focus and when we tried to peel the oranges that were our snack that was hard too. | |
| 12/6 | 1 | We attached our guide wire and tested our car on the guide line. | It was hard to attach the guide wire and get it lined up straight. | We added the guide to the car body. |
| 1/3 | 1 | We brainstormed an idea on how we could attach the solar panel. | It was hard to attach the guide wire and get it lined up straight. | |
| 1/17 | 1 | We built the idea that that we brainstormed and added it to the car. We decided to make two pieces of balsa wood attached to wire that could move to let the panel face the sun on either side and in front of the car. | It was hard to build because the holes for the wires were too small. We wanted to make sure the panel could face the sun so that made it hard. | Solar panel mount was added to the car body. |
| 1/24 | 1 | We attached the solar panel to the mount using Velcro and tested the car in the sun. | We had trouble hooking up the panel. | Solar panel was added to the car body. |
| 1/30 | 1 | We added design features like a point to make it more aerodynamic and rubber bands for my wheels to give it more traction. | We had trouble attaching the point in the front. | We added a point to the front of the car and put rubber bands on the wheels. |
| 2/28 | 1 | We made the decision to add a push button to our car to make it easier to start. We wanted to get times using our solar panel but another team got hot glue on our panel so we were not able to test the car. | Another team accidently got glue on our solar panel so we were unable to get times today. | Added a push button switch. Our car now has no solar panel. |
| 3/6 | 1 | Our teacher got us a new solar panel and we attached it. | We went outside to get times with our new solar panel but it was a dud. | |
| 3/13 | 1 | Our teacher got us another solar panel. We re-velcroed the panel so that the velcro pieces lined up correctly. | It took a lot of work to attach the panel. We used many pieces of Velcro and we had to make it all line up. | New solar panel added to wooden panel supports. |
| 3/17 | 1 | We were able to get good times with our new solar panel but the car is turning. | The new solar panel had a bad connection and my car was turning so we had to make the wheels straighter. At the end of the day two pieces broke off of our car. | |
| 3/18 | 1 | We were able to reattach the two pieces that came off, but another piece broke. So frustrating. | Another piece broke. | |
| 3/19 | 1 | We were able to get our car running straight by using the heat gun and nudging the wheels. | We had to figure out how to nudge the wheels correctly to make the car go straight. | |
| 3/20 | 1 | We switched out our solar panel again and had to do all of the Velcro again. Then we found out that one of the alligator clips was not connected well to the wire. That bad connection could have been why it did not run well. We ran our cars on both solar and battery today and our car ran straight and fast. We worked on the webpage. | We found out that one of the alligator clips going to the panel had a loose connection. That might have been the reason it seemed like the panels were bad. | We changed the solar panel again. |
| 3/21 | 1 | We worked on the Webpage. | ||
| 3/22 | 1 | We worked on the Webpage. | ||
| 3/23 | 2 | We worked on the Webpage. | ||
| 3/24 | 2 | We worked on the Webpage. Our alligator clip broke so we had to replace it. We also ran the car and got some videos of the car running. The sun was great today. We got our fastest time so far. We ran 19 M in 7 seconds. We think it is because of our new tilt of the panel. After break we will practice using a voltmeter to find the best angle for our panel | We had to replace a broken alligator clip. We tilted the panel downward in the front for better aerodynamics and a better line to the sun. Our teacher soldered our wires. | |
| 4/3 | 1.5 |
Design Drawings
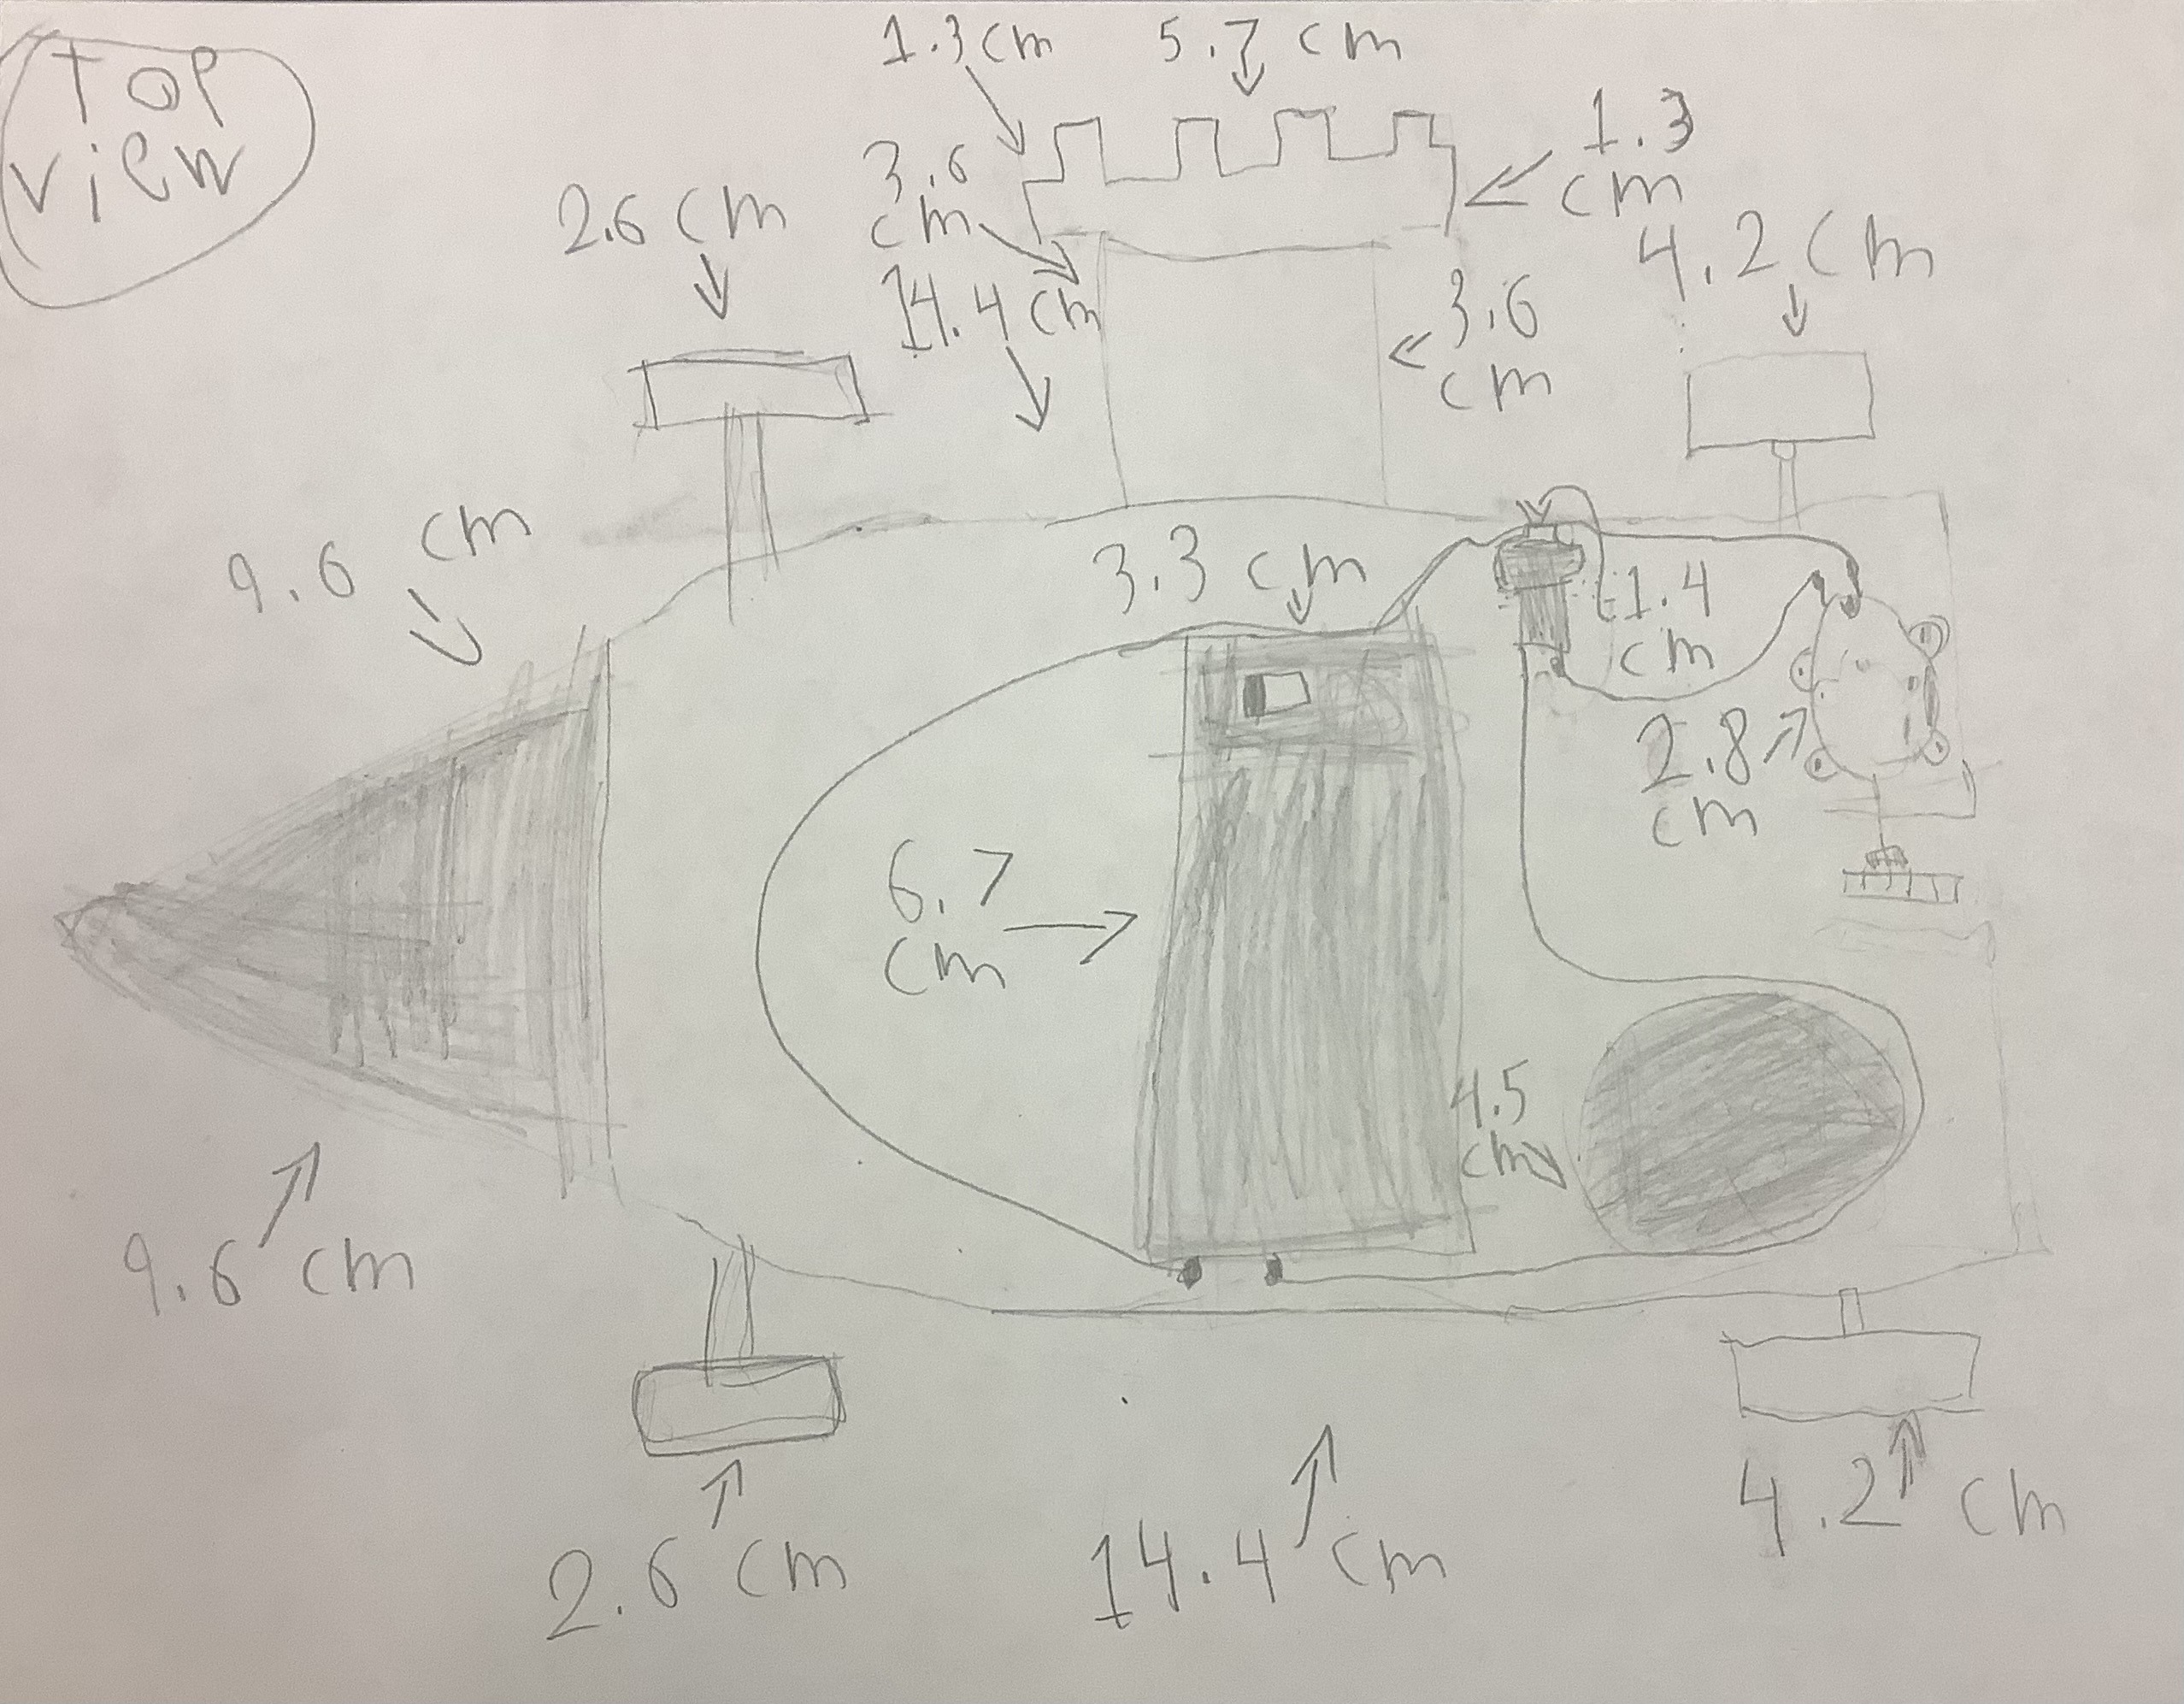
Design Drawing: Top View
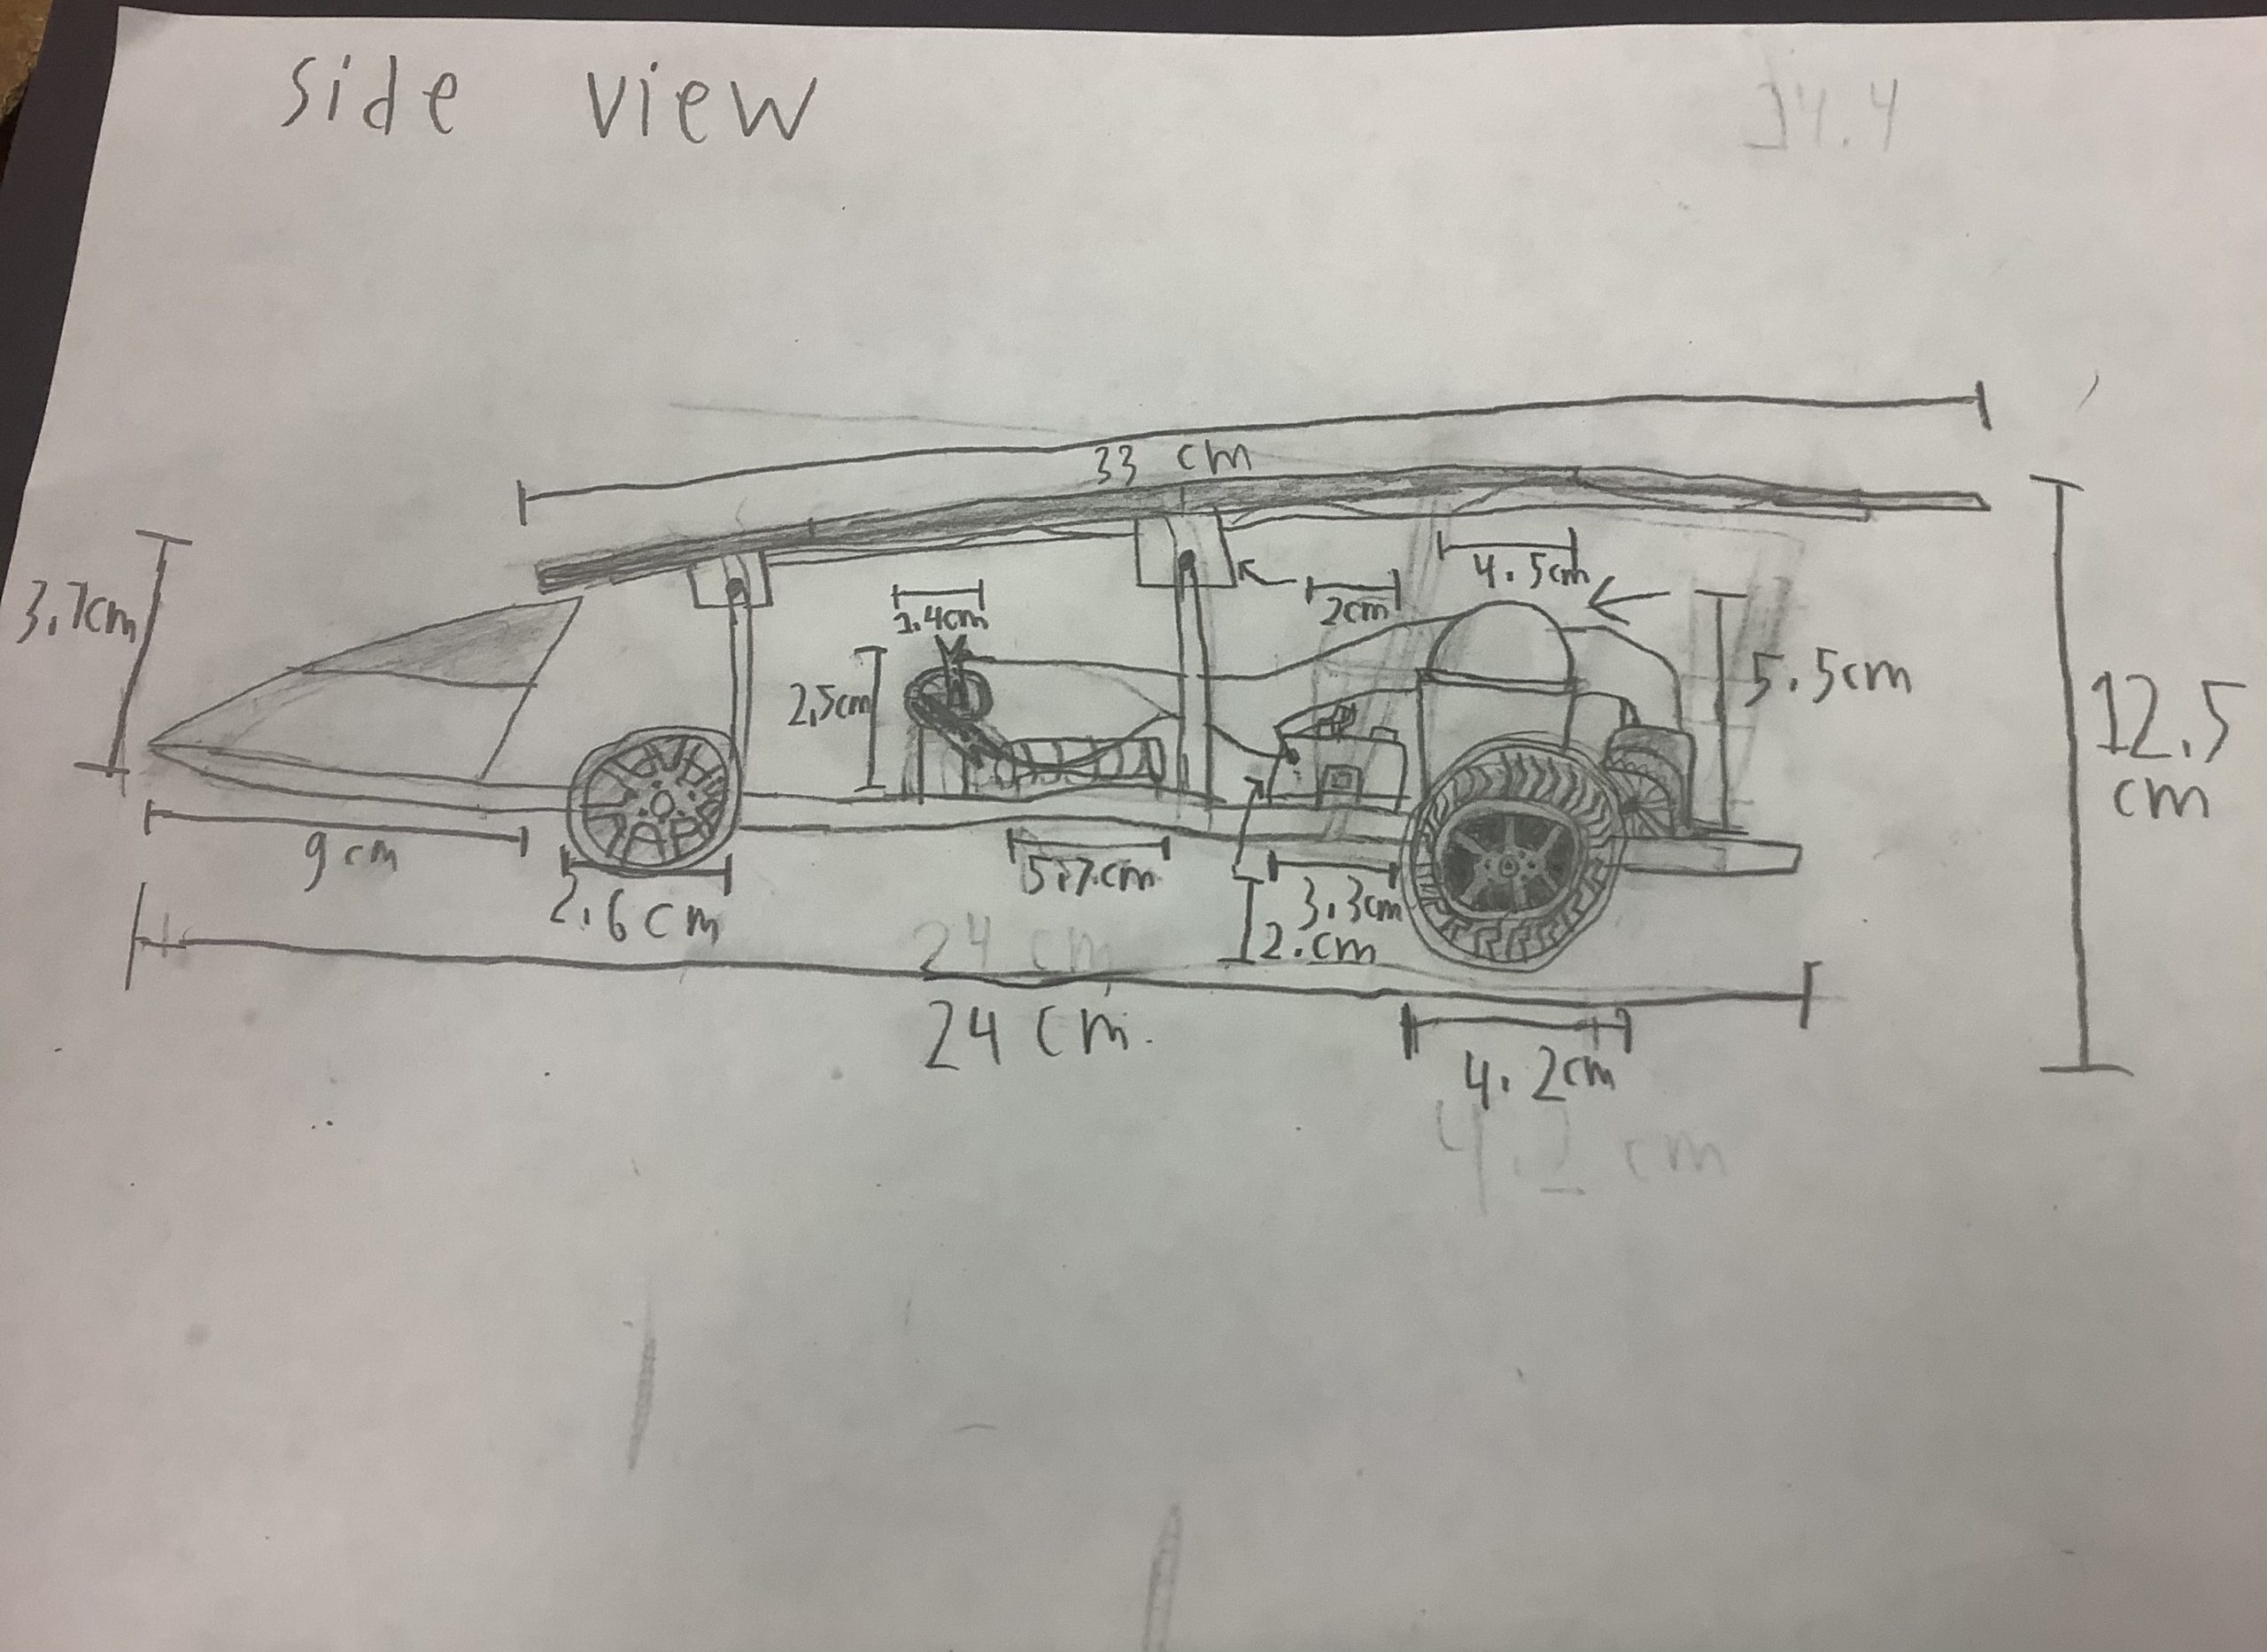
Design Drawing: Side View
Final Car Specifications
| Car Size with Panel | Length: 33.5 cm | Width: 16.4 cm | Height: 12.5 cm |
| Weight with Panel | 240.8 g | ||
| Wheel Size | Front wheels: 2.8 cm | Back Wheels: 3.8 cm | |
| Gear Ration | motor gear: axel gear 20 : 60 = 1 : 3 |
Materials Used
| Item | Approx. Cost |
| Solar Made Solar Panel (3V) | 38.25 |
| small white gears, wheels and axels | 3.99 |
| Solar Made Motor (3V) | 5.25 |
| balsa wood for base, car point, solar panel support board, guide support | 3.99 |
| straw pieces for bearings (4) – 2 straws style straw for decoration (2) | 2.31 |
| battery pack with switch | 0.26 |
| push button switch | 3.85 |
| piece of black binder comb to hold guide wire | 0.07 |
| alligator clips (4) | 0.56 |
| front wheels (orange and black) | 2.50 |
| back wheels (black with rubber bands for traction) | 1,00 |
| wooden blocks (1.2 inch (4) and 1/8 inch (1)) | 1.00 |
| two axles (front and rear) | 2.25 |
| copper colored wire | .25 |
| yellow craft stick | .10 |
| Consumables: | |
| masking tape, scotch tape, duct tape | |
| solder | |
| velcro to attach solar panel | .50 |
| hot glue | |
| Recycled materials: | |
| plastic cup to hold the ping-pong ball | |
| Total Cost: 66.13 |
Test Results / Trial Runs
Test Runs 1 – date: 2/29/24
Weather conditions:
Ran on panel or battery?
Observations of results: Our car was turning left.
Any recommendations for improvements: Since our car was turning left. We have to nudge the bearings to straighten the axel so that it will go straight.
| Attempt | Time, S (seconds) | Distance, M (meters) | Speed, M/S |
| 1 | DNF | 20 | |
| 2 | DNF | 20 | |
| 3 |
Test Runs 2 – date: 3/9/24
Weather conditions: Mostly sunny.
Ran on panel or battery? We ran on panel when it was sunny and on battery when it was cloudy.
Observations of results: Our car is still turning but not as much. At least it finished now.
Any recommendations for improvements: We have to figure out how to make it go straight. There is also a problem with the wiring. Sometimes it doesn’t go. We think it might be the connector on the panel.
| Attempt | Time, S (seconds) | Distance, M (meters) | Speed, M/S |
| 1 – battery | 16.8 | 20 | 1.19 |
| 2 – panel | 19.5 | 20 | 1.03 |
| 3 – panel | DNF |
Test Runs 3 – date: 3/10/24
Weather conditions: Cloudy so we ran on battery in the hall.
Ran on panel or battery? Ran on battery.
Observations of results: Our car is still turning.
Any recommendations for improvements: The car is still not running straight. We have to make sure the axles are straight.
| Attempt | Time, S (seconds) | Distance, M (meters) | Speed, M/S |
| 1 – battery | 9.07 | 16.5 | 1.82 |
| 2 – battery | 9.31 | 16.5 | 1.77 |
| 3 |
Test Runs 4 – date: 3/20/24
Weather conditions: partly cloudy
Ran on panel or battery? panel
Observations of results: Our car ran very well. During one race, our rubber band came off.
Any recommendations for improvements: Before running the car this time we decided to tilt the solar panel towards the front to catch more sun. That improved our speed.
| Attempt | Time, S (seconds) | Distance, M (meters) | Speed, M/S |
| 1 – panel | 8.18 | 20 | 2.44 |
| 2 – panel | 9.06 | 20 | 2.21 |
| 3 – panel | 8.19 | 20 | 2.44 |
Test Runs 5 – date: 3/24/24
Weather conditions: mostly sunny
Ran on panel or battery? solar panel
Observations of results: We got our fastest time today. It went really straight, then sometimes turned a little. We have to figure out why that is happening. It made a difference that we angled the panel down in the front.
Any recommendations for improvements: We tried to run the car with and without rubber bands. It didn’t improve the speed or the turning. Since our panel is adjustable, we want to use a volt meter to find the best angle for the sun.
| Attempt | Time, S (seconds) | Distance, M (meters) | Speed, M/S |
| 1 – panel | 7.00 | 19 | 2.71 |
| 2 – panel | 8.13 | 19 | 2.33 |
| 3 – panel | 11.78: low light | 19 | 1.61 low light |
| 4 – panel | 7.59 | 19 | 2.50 |
| 5 – panel | 8.31 | 19 | 2.28 |
| 6 – panel | 7.37 | 19 | 2.57 |
Video of Our Car Running
Car Features Video
Additional Information
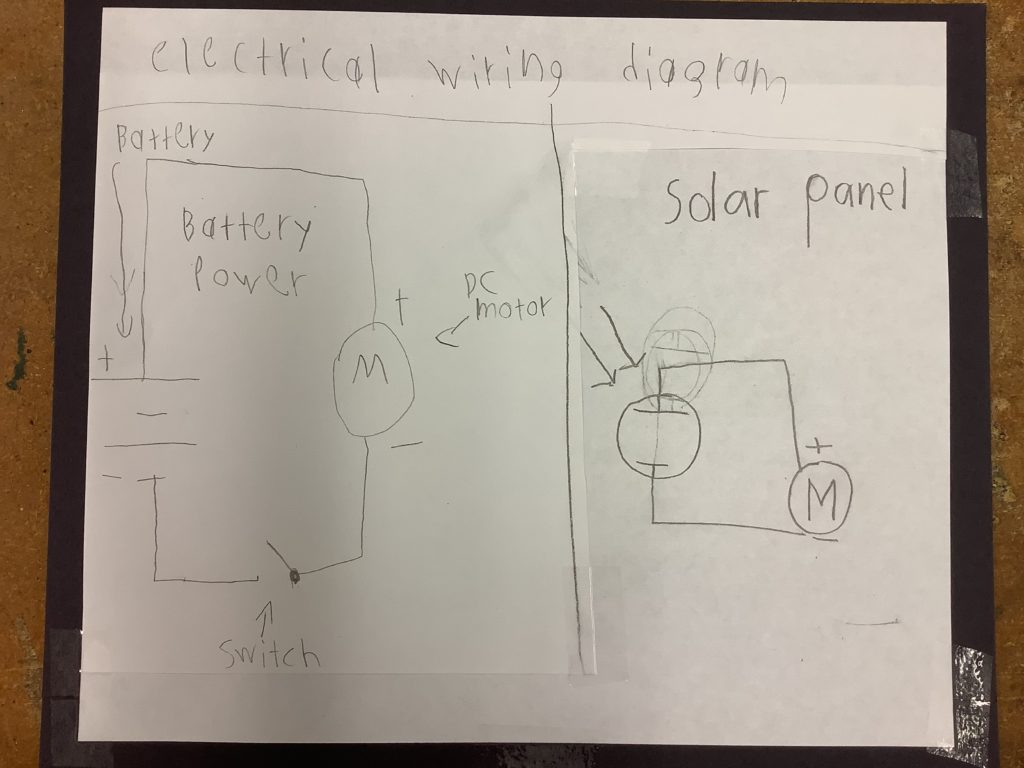
Electrical Schematic: This is our schematic of the electrical circuits. It is the same DC motor in both drawings.

A 3D Version of our Solar Car below the actual car
Very unique way to mount your solar panel, congratulations on thinking outside of the box!