
The NSU Slightly Above Average Joes
Event Location: Cocoa-FL
Competition: Junior Solar Sprint
Division: 4-6 (JSS Green)
School: NSU University School
Team Name: The NSU Slightly Above Average Joes
Project Name: Solar AutoJOEbile
Team Size: 3
Team Information
Our Slightly Above Average Car…the AutoJOEbile
| Car Name: The AutoJOEbile |
| Team Name: The NSU Slightly Above Average Joes |
| School Name: NSU University School |
| Team Members Names: Dominic A., Elis A., and Ignacio E. |
Design Documentation
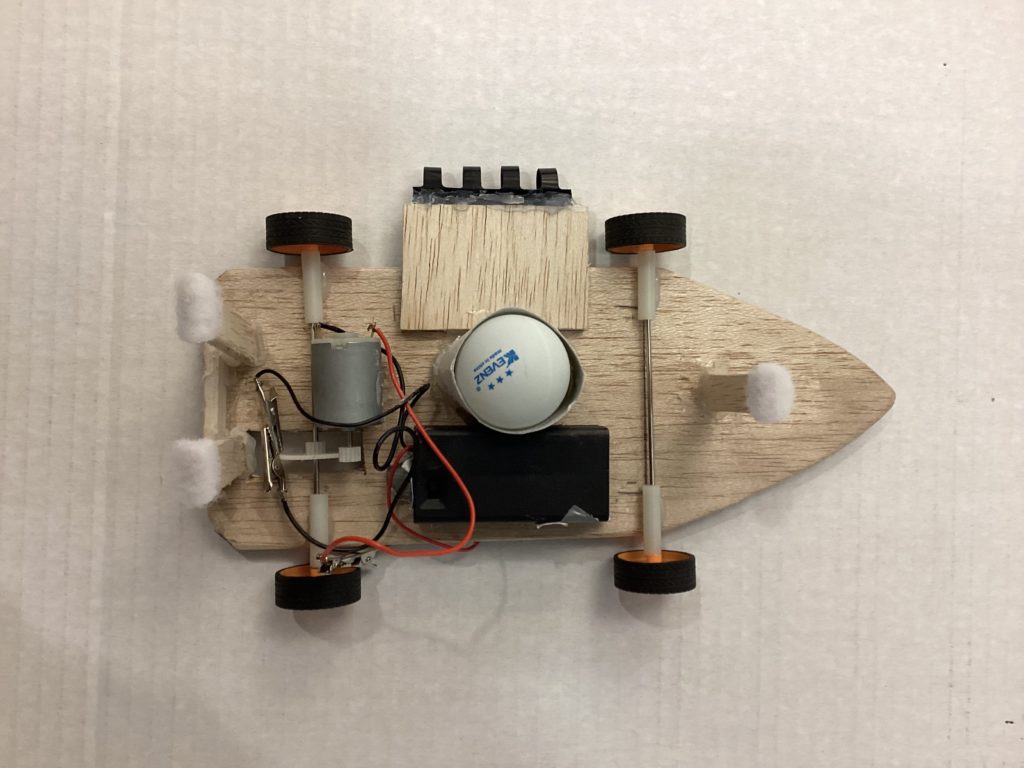
Top View without Solar Panel

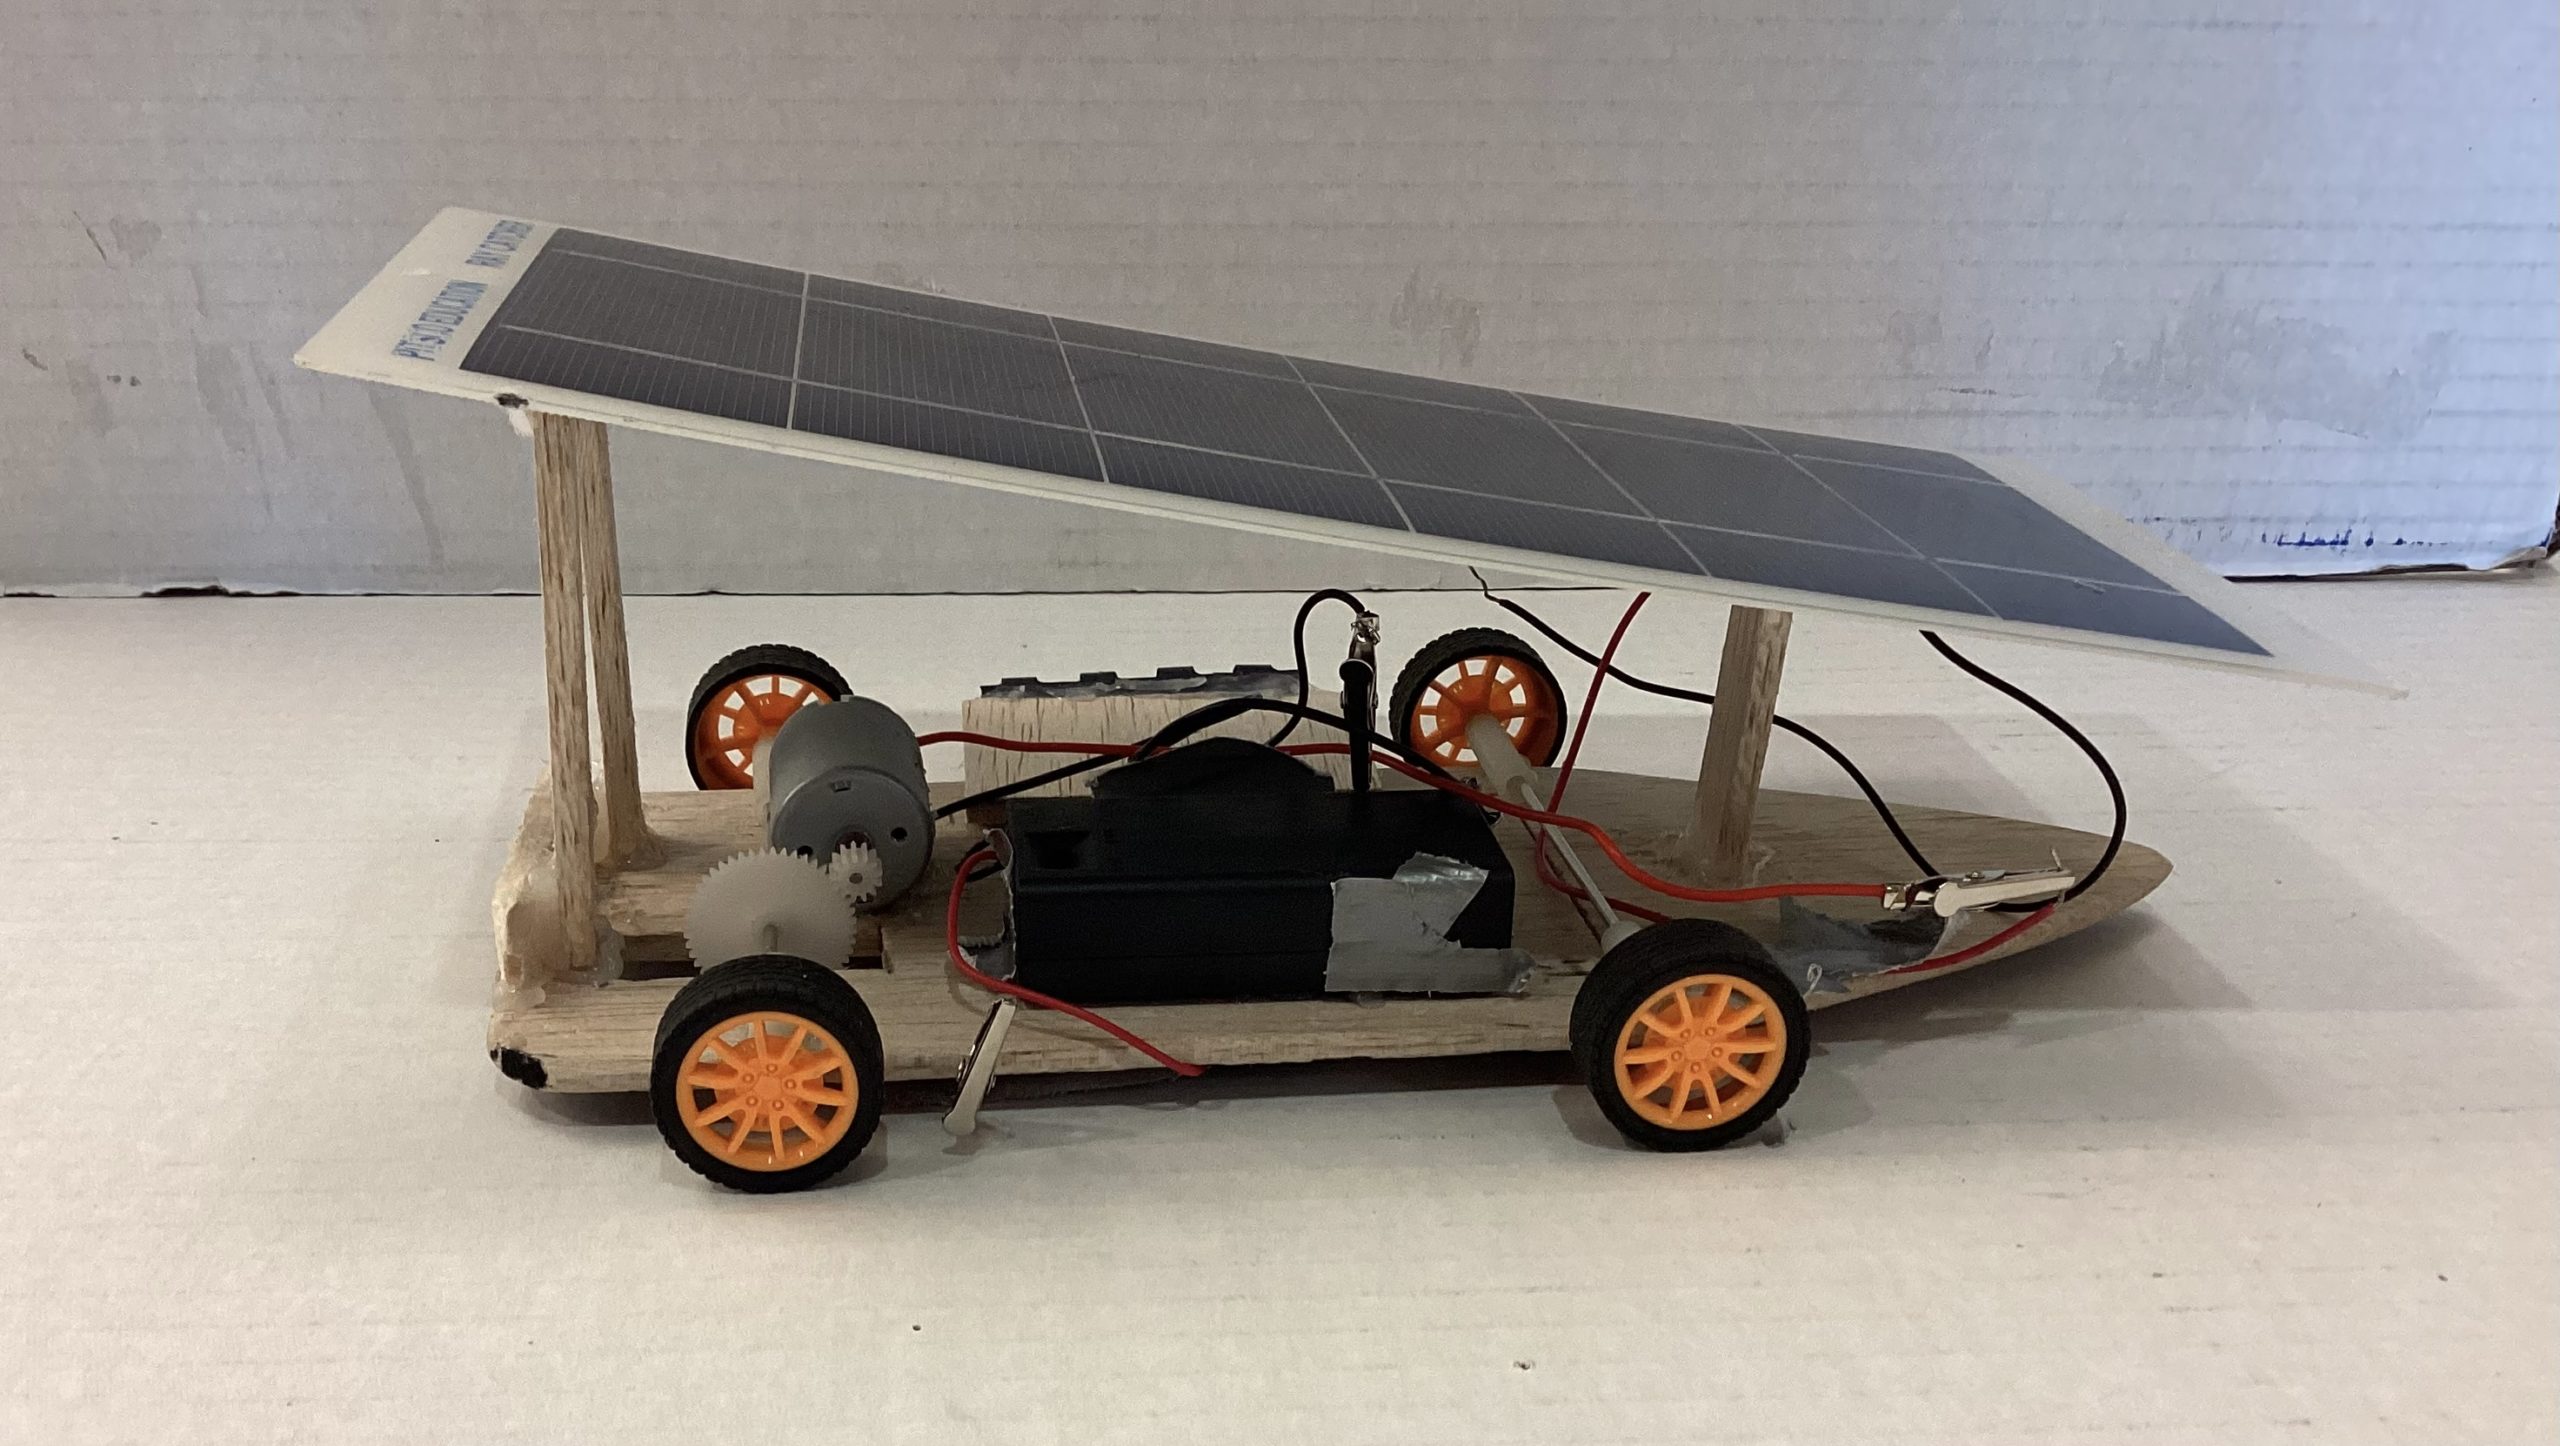
Side View #1
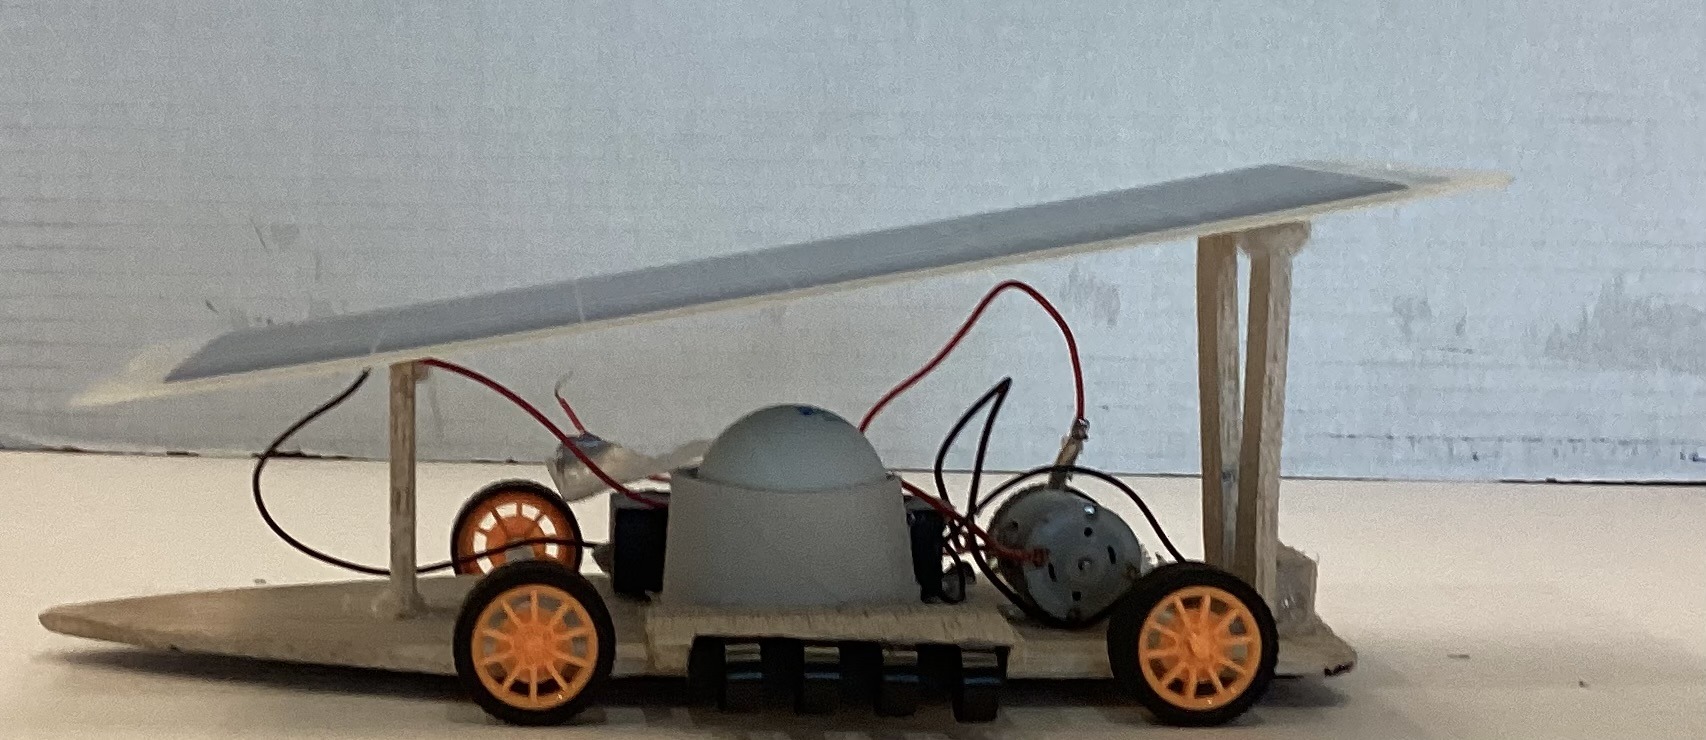
Side View #2
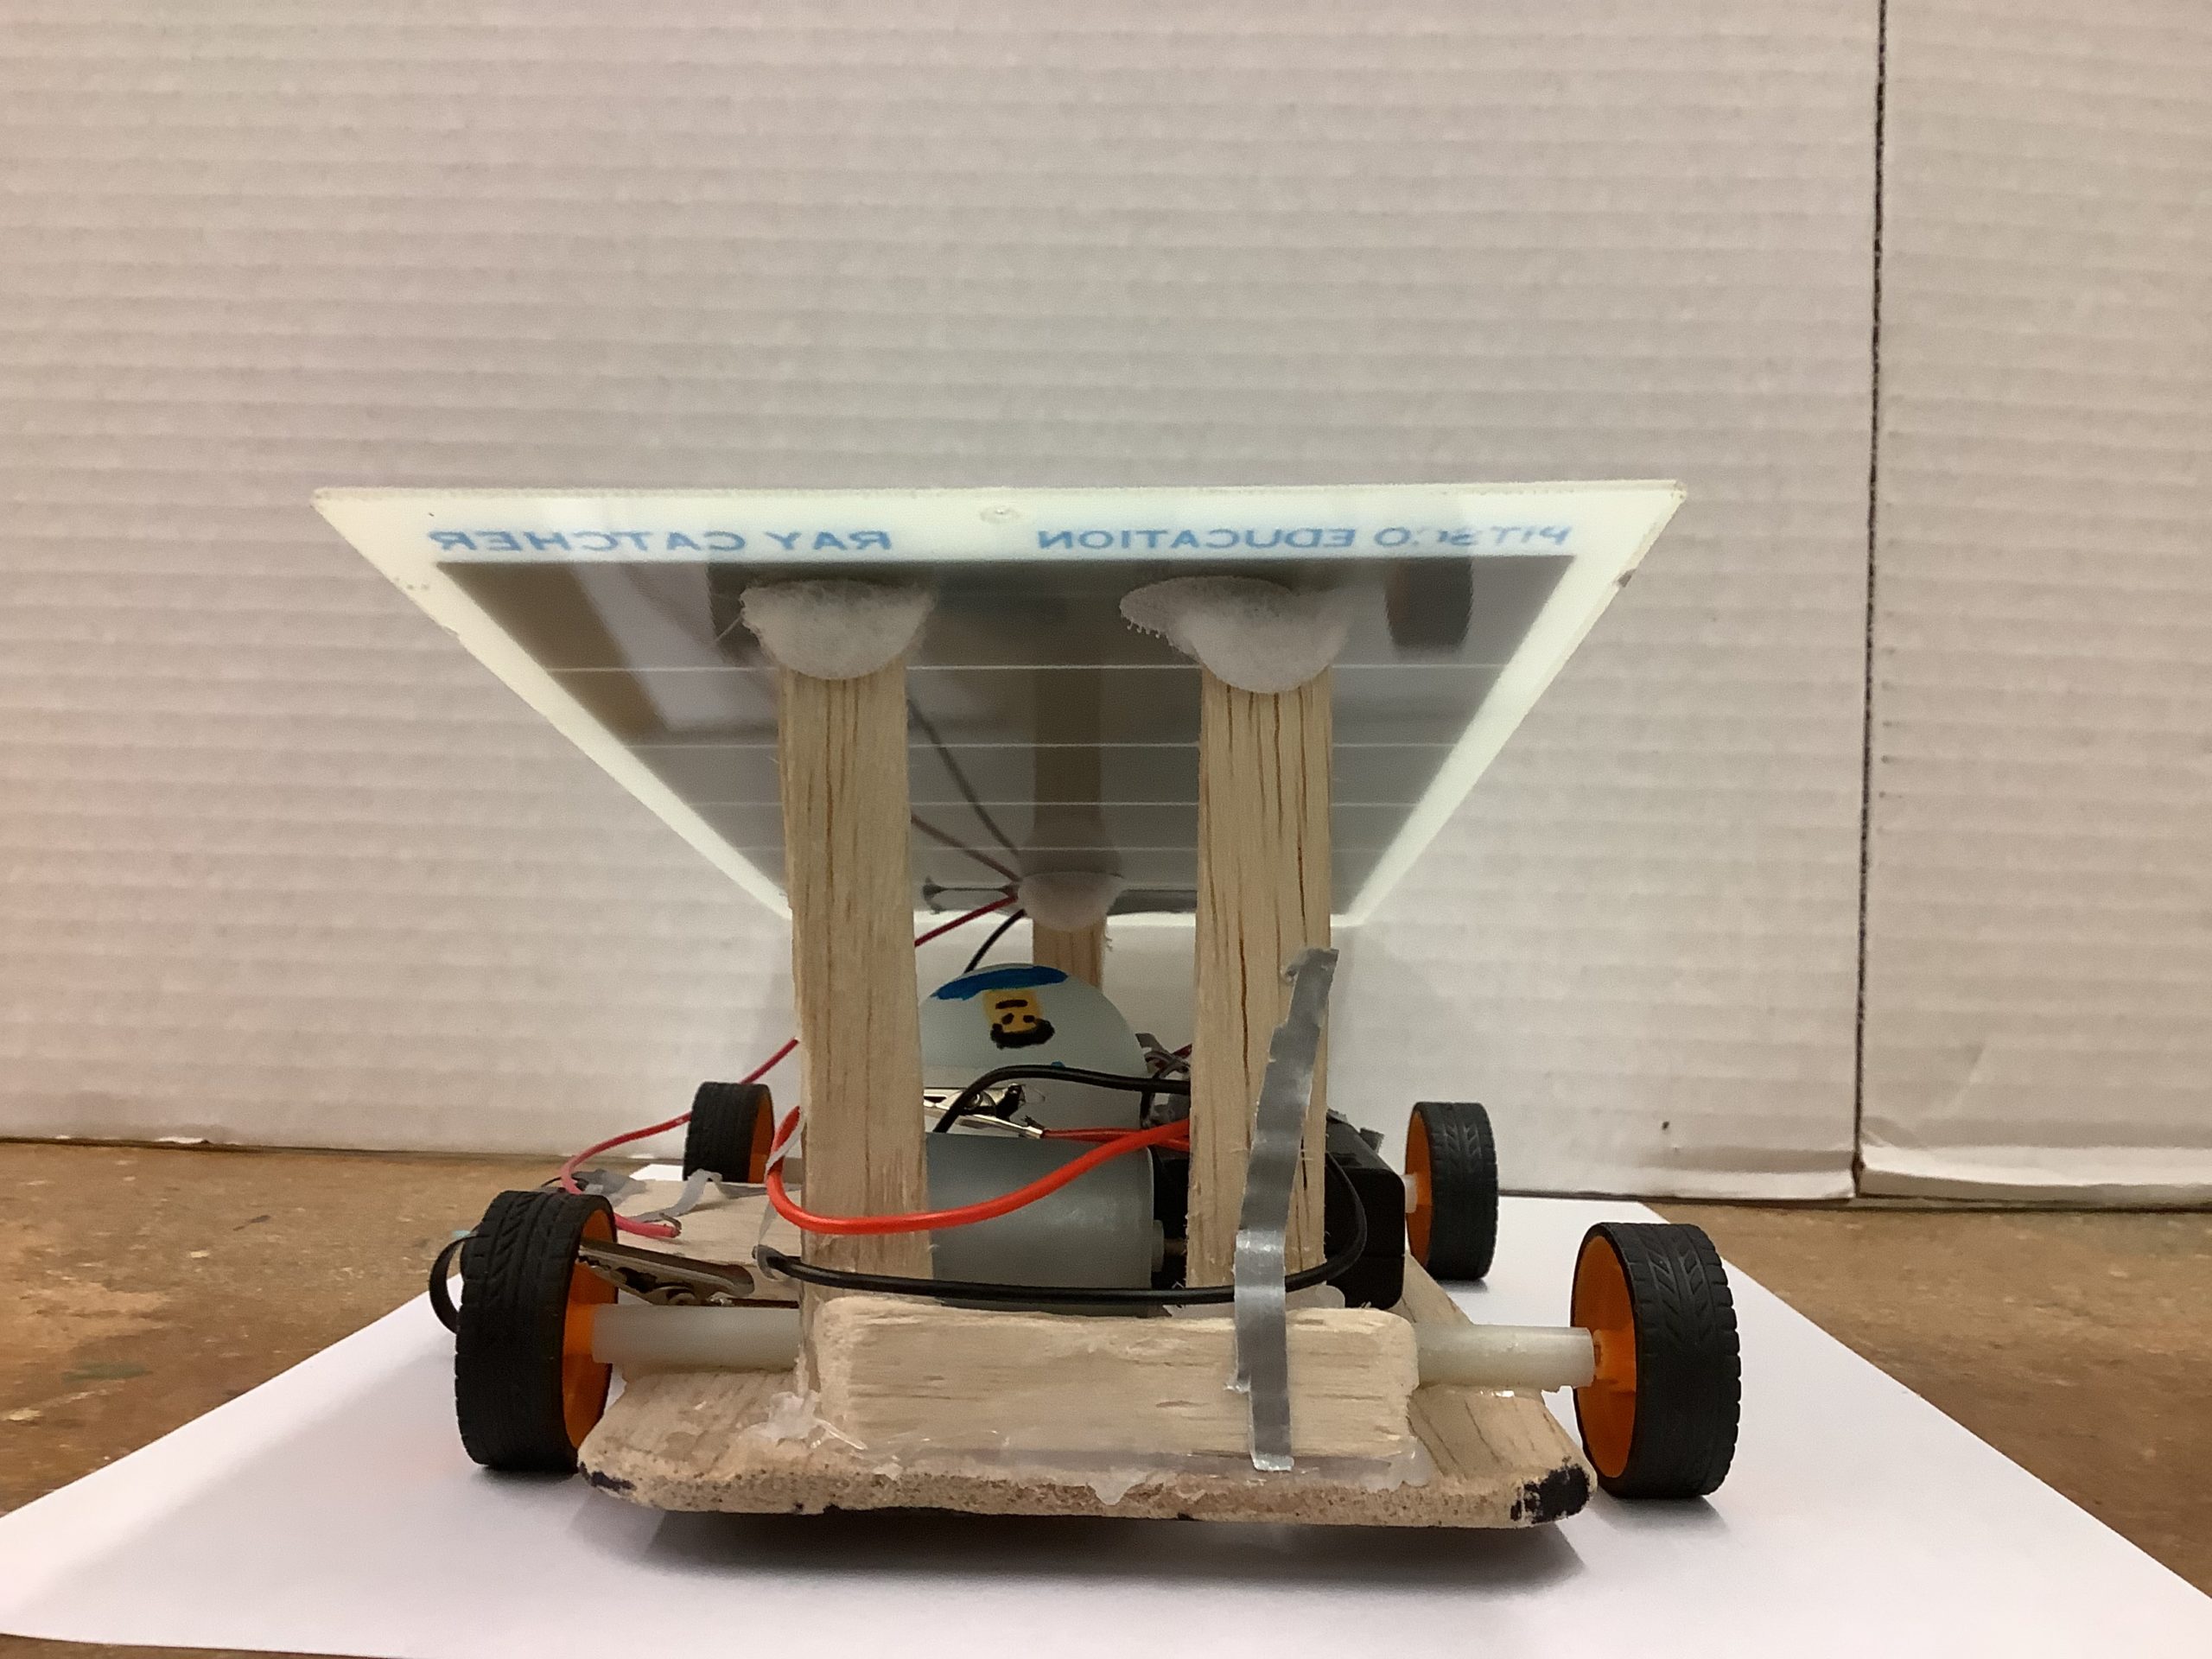
Back View
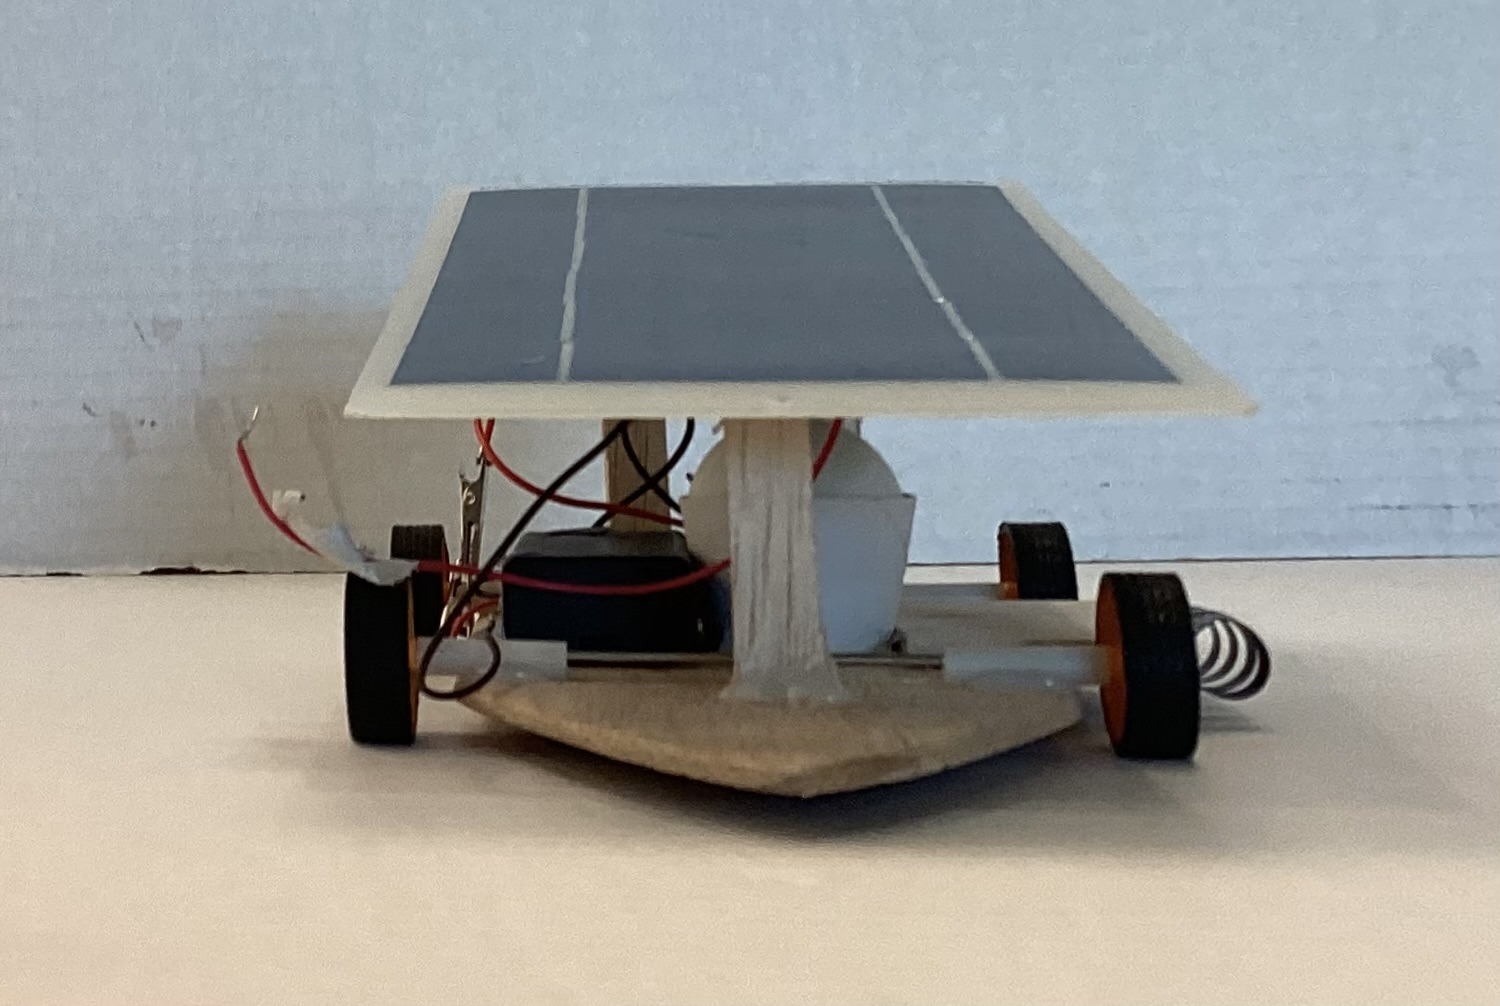
Front View
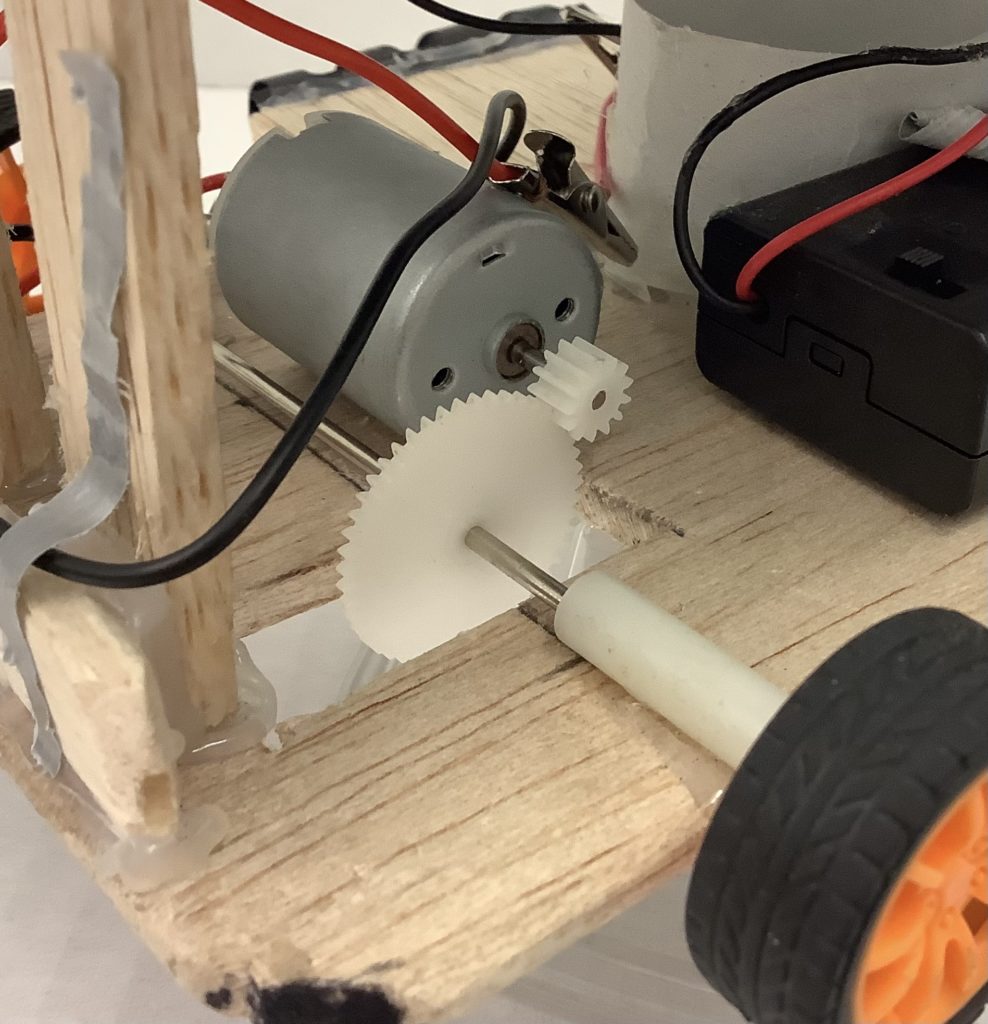
Special Feature: Our gear ratio makes our car fast!
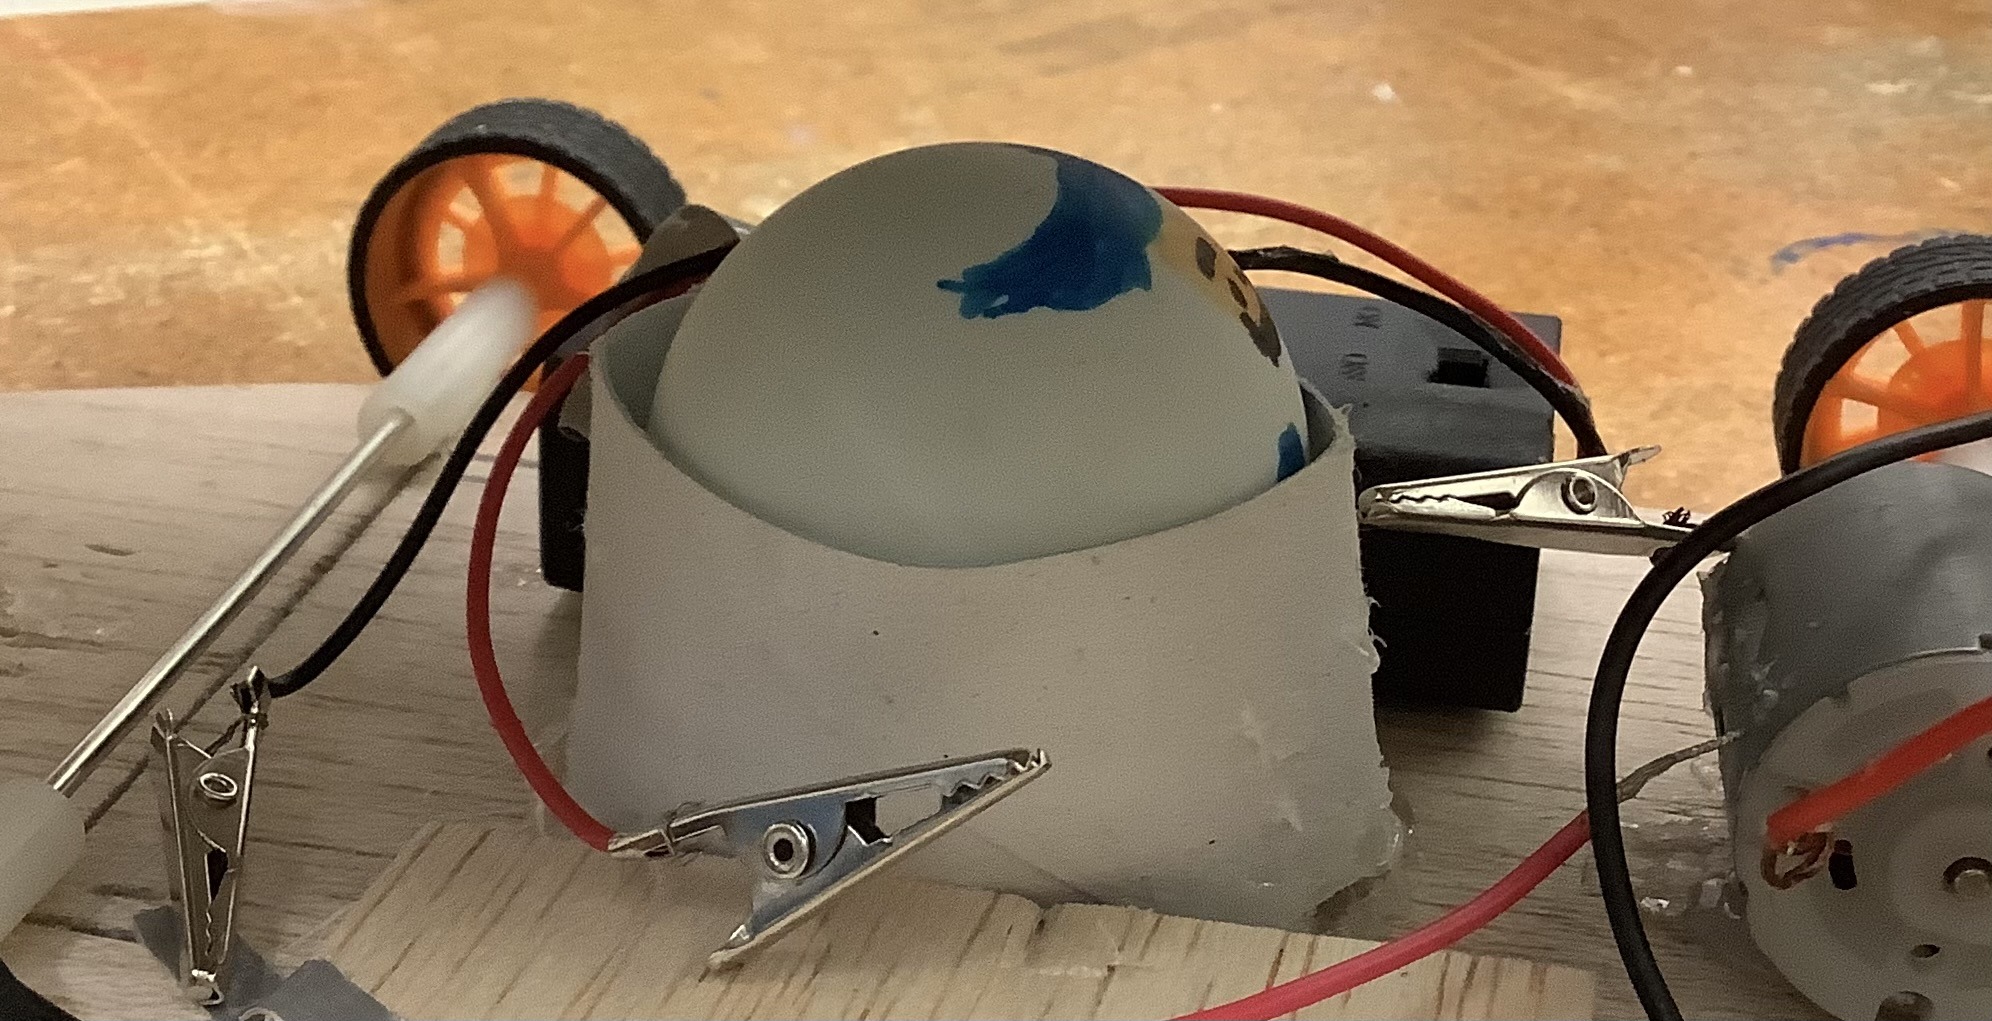
Special Feature: Light, simple ball holder, switch/battery pack combo
Project Log
| Date | Hours | Tasks / Work Done | Obstacles Encountered | Modifications to Car |
| 8/23 | 1 | We drew our idea of what our car would look like. We looked at samples of cars. We made a ball holder for the passenger. | It was hard for us to understand the concepts because we had never built a solar car before. | We made a ball holder. |
| 8/30 | 1 | We gathered materials. We cut the car body and sanded the sides. We chose the sturdy blue panel. | Making the design was difficult because we didn’t have an idea of what the design should be. We had to decide a shape and that was difficult. | The car body shape is finished. |
| 9/6 | 1 | We colored the car body and we attached the front wheels on the axle. We chose small diameter wheels and small hollow cylinders for bearings. | Putting the wheels on the axle so that it didn’t bend was difficult. | The car’s front wheels are installed. |
| 9/13 | 1 | We did the back wheels. We chose small, white, plastic gears. We decided on a small gear on the motor and a medium sized gear on the back axel. We cut the hole in the body so that the gear would fit. We are going to put the wheels and axels on top of the body. | At first we bent the axel when we were hitting it with the hammer. We had to do it over. | |
| 9/20 | 1 | We attached the back wheels on the car. We decided on the battery pack, motor and panel. We chose a battery back with a switch. We chose the pitsco solar panel and motor. | We found it hard to strip and connect the wires. | The back wheels, axel and gear are on the car body. |
| 9/27 | 1 | We attached our wires to the motor and battery pack. Our battery pack has a switch. We put the motor on the car. | We had a hard time aligning the motor gear with the axel gear. There was space between them. | The motor is on the car. |
| 10/4 | 1 | We attached the supporters to the car body and we used velcro to attach the solar panel. We worked a lot on how high to make the support posts and where to attach them because we didn’t want to add air resistance. | Finding a way to make the supporters aerodynamic and not break the air flow. | The solar panel supporters are on the car. |
| 10/19 | 1 | We finished attaching the supporters and the panel. We put velcro on the posts so that we could remove the solar panel if we had to. | The solar panel is on the car. | |
| 10/26 | 1 | We ran the car in the hall. The motor came off when we caught it and one of the solar panel supports broke at the base. | Motor came off and a panel support broke. | |
| 11/2 | 1 | We fixed the motor and panel support. There was no time to test it. | Motor and panel support are re-attached. | |
| 11/30 | 1 | We worked on making the supports stronger. We want to keep the supports light and thin but they have to be strong enough that they will not break. | ||
| 12/7 | 1 | We tested the car outside to see how it was performing. It runs fast but is turning slightly to the right. | The car turned slightly to the right. | |
| 12/14 | 1 | We worked on trying to get the car to go straight. It is now turning left. | Now it is turning left. | |
| 12/21 | 1 | We worked some more on trying to get the car to go straight. | Still turning left. | |
| 1/25 | 1 | We put on our guide so now we can run it on the guide wire. | It was not easy getting the guide at the right height and making sure it is straight. | The guide wire is attached |
| 2/1 | 1 | In the hall it seems like the car is going straight. We put on the ball holder so that we can have a passenger. | It took time to decide what the ball holder should be made out of and where it should be placed | We attached the ball holder. |
| 2/29 | 1 | We ran our car in the hall. It was turning and not going that fast. We used a heat gun and tried to straighten the axle. | Car was still turning and not going just a little crooked. | |
| 3/7 | 1 | We got our car to go straight! It was exciting since we had to try to straighten the axles so many times | ||
| 3/14 | 1 | We ran our car outside today. It went straight and fast. We ran it 3 times on panel and one time on battery. We got a very fast time of 2.46 m/s. | ||
| 3/16 | 1 | We ran our car again today. It ran slowly on battery and fast on solar panel. We think that the batteries were low. We are also going to check our wiring, though, in case it is a connection from the battery to the motor or switch that is not making good contact. | There was a bad connection in the wires. | |
| 3/21 | 1 | We fixed the problem that turned out to be not a good wire connection. We fixed how the wires are organized on the car. | ||
| 3/22 | 1 | We started on the webpage. | ||
| 3/24 | 1 | We ran our car on solar panel today and got our fastest time! Our car went 20 m in 7 s. That is 2.86 m/s. | ||
| 4/1 | 1 | We are working on our webpage. | ||
| 4/2 | 1 | We worked on our webpage. | ||
| 4/3 | 1 | We finished the webpage. We realized that we didn’t have the place to put the car number so we added it. | We added the wood pieces that will display our car number. |
Design Drawings
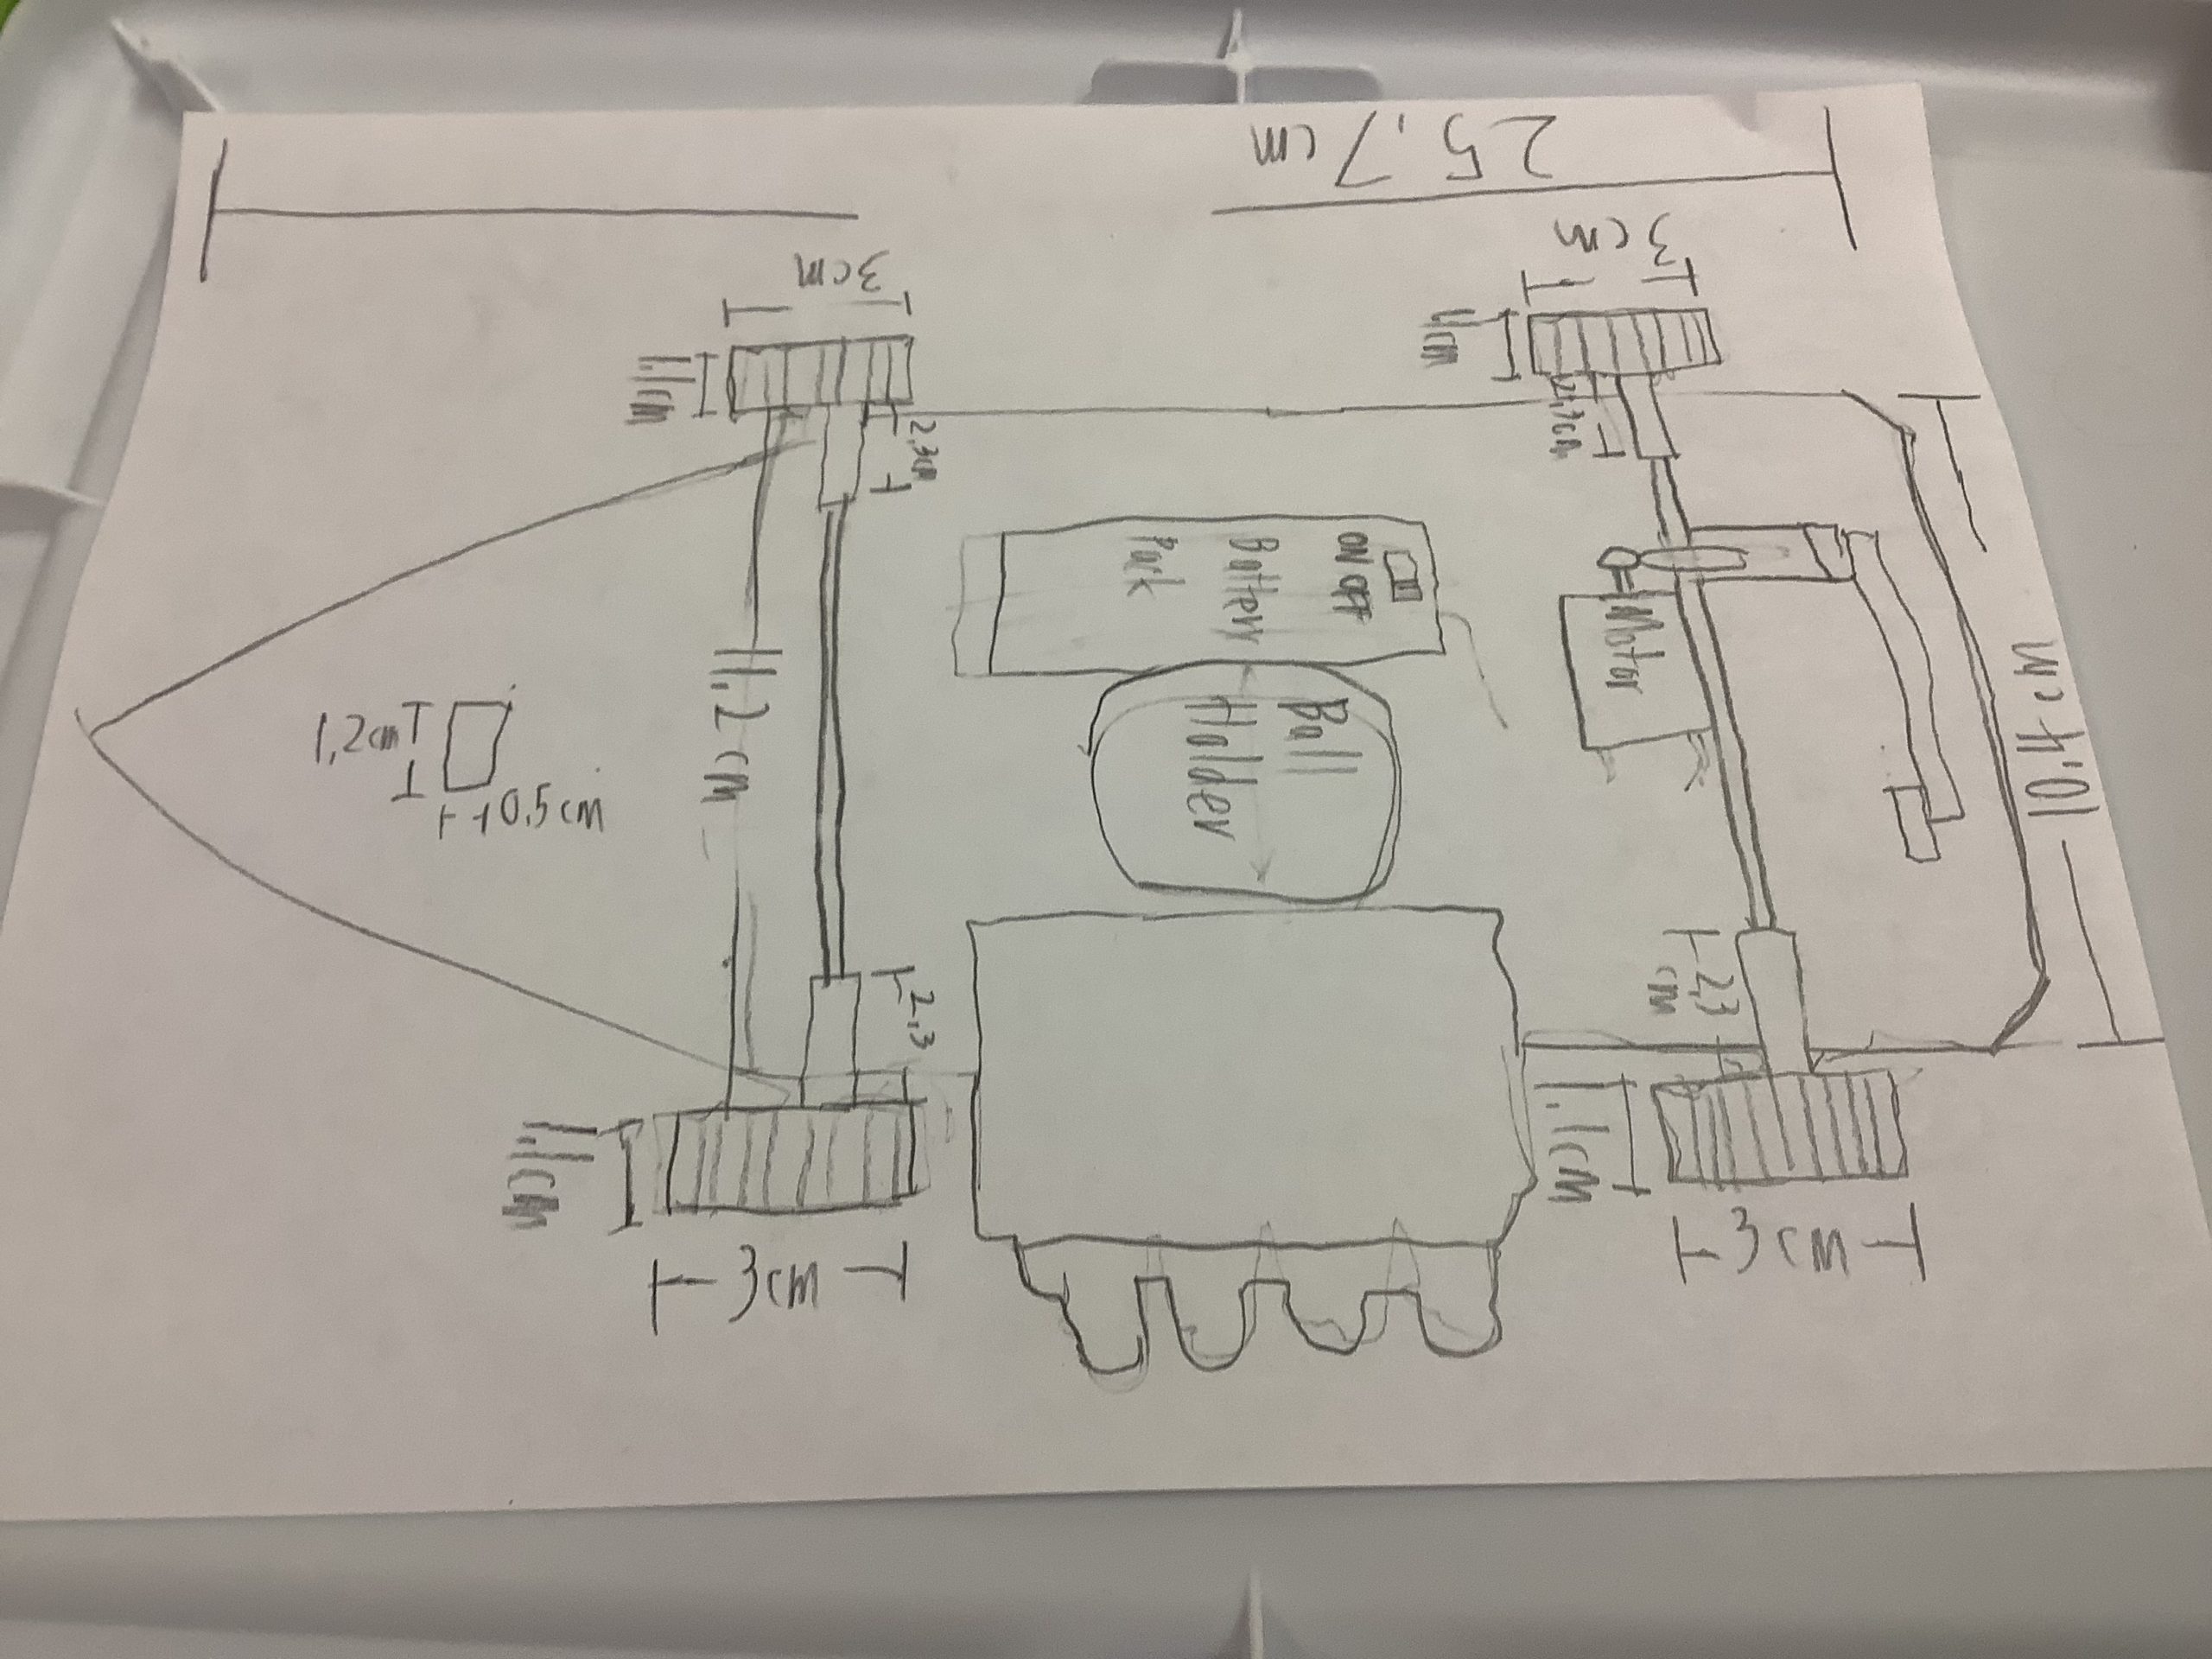
Design Drawing: Top View
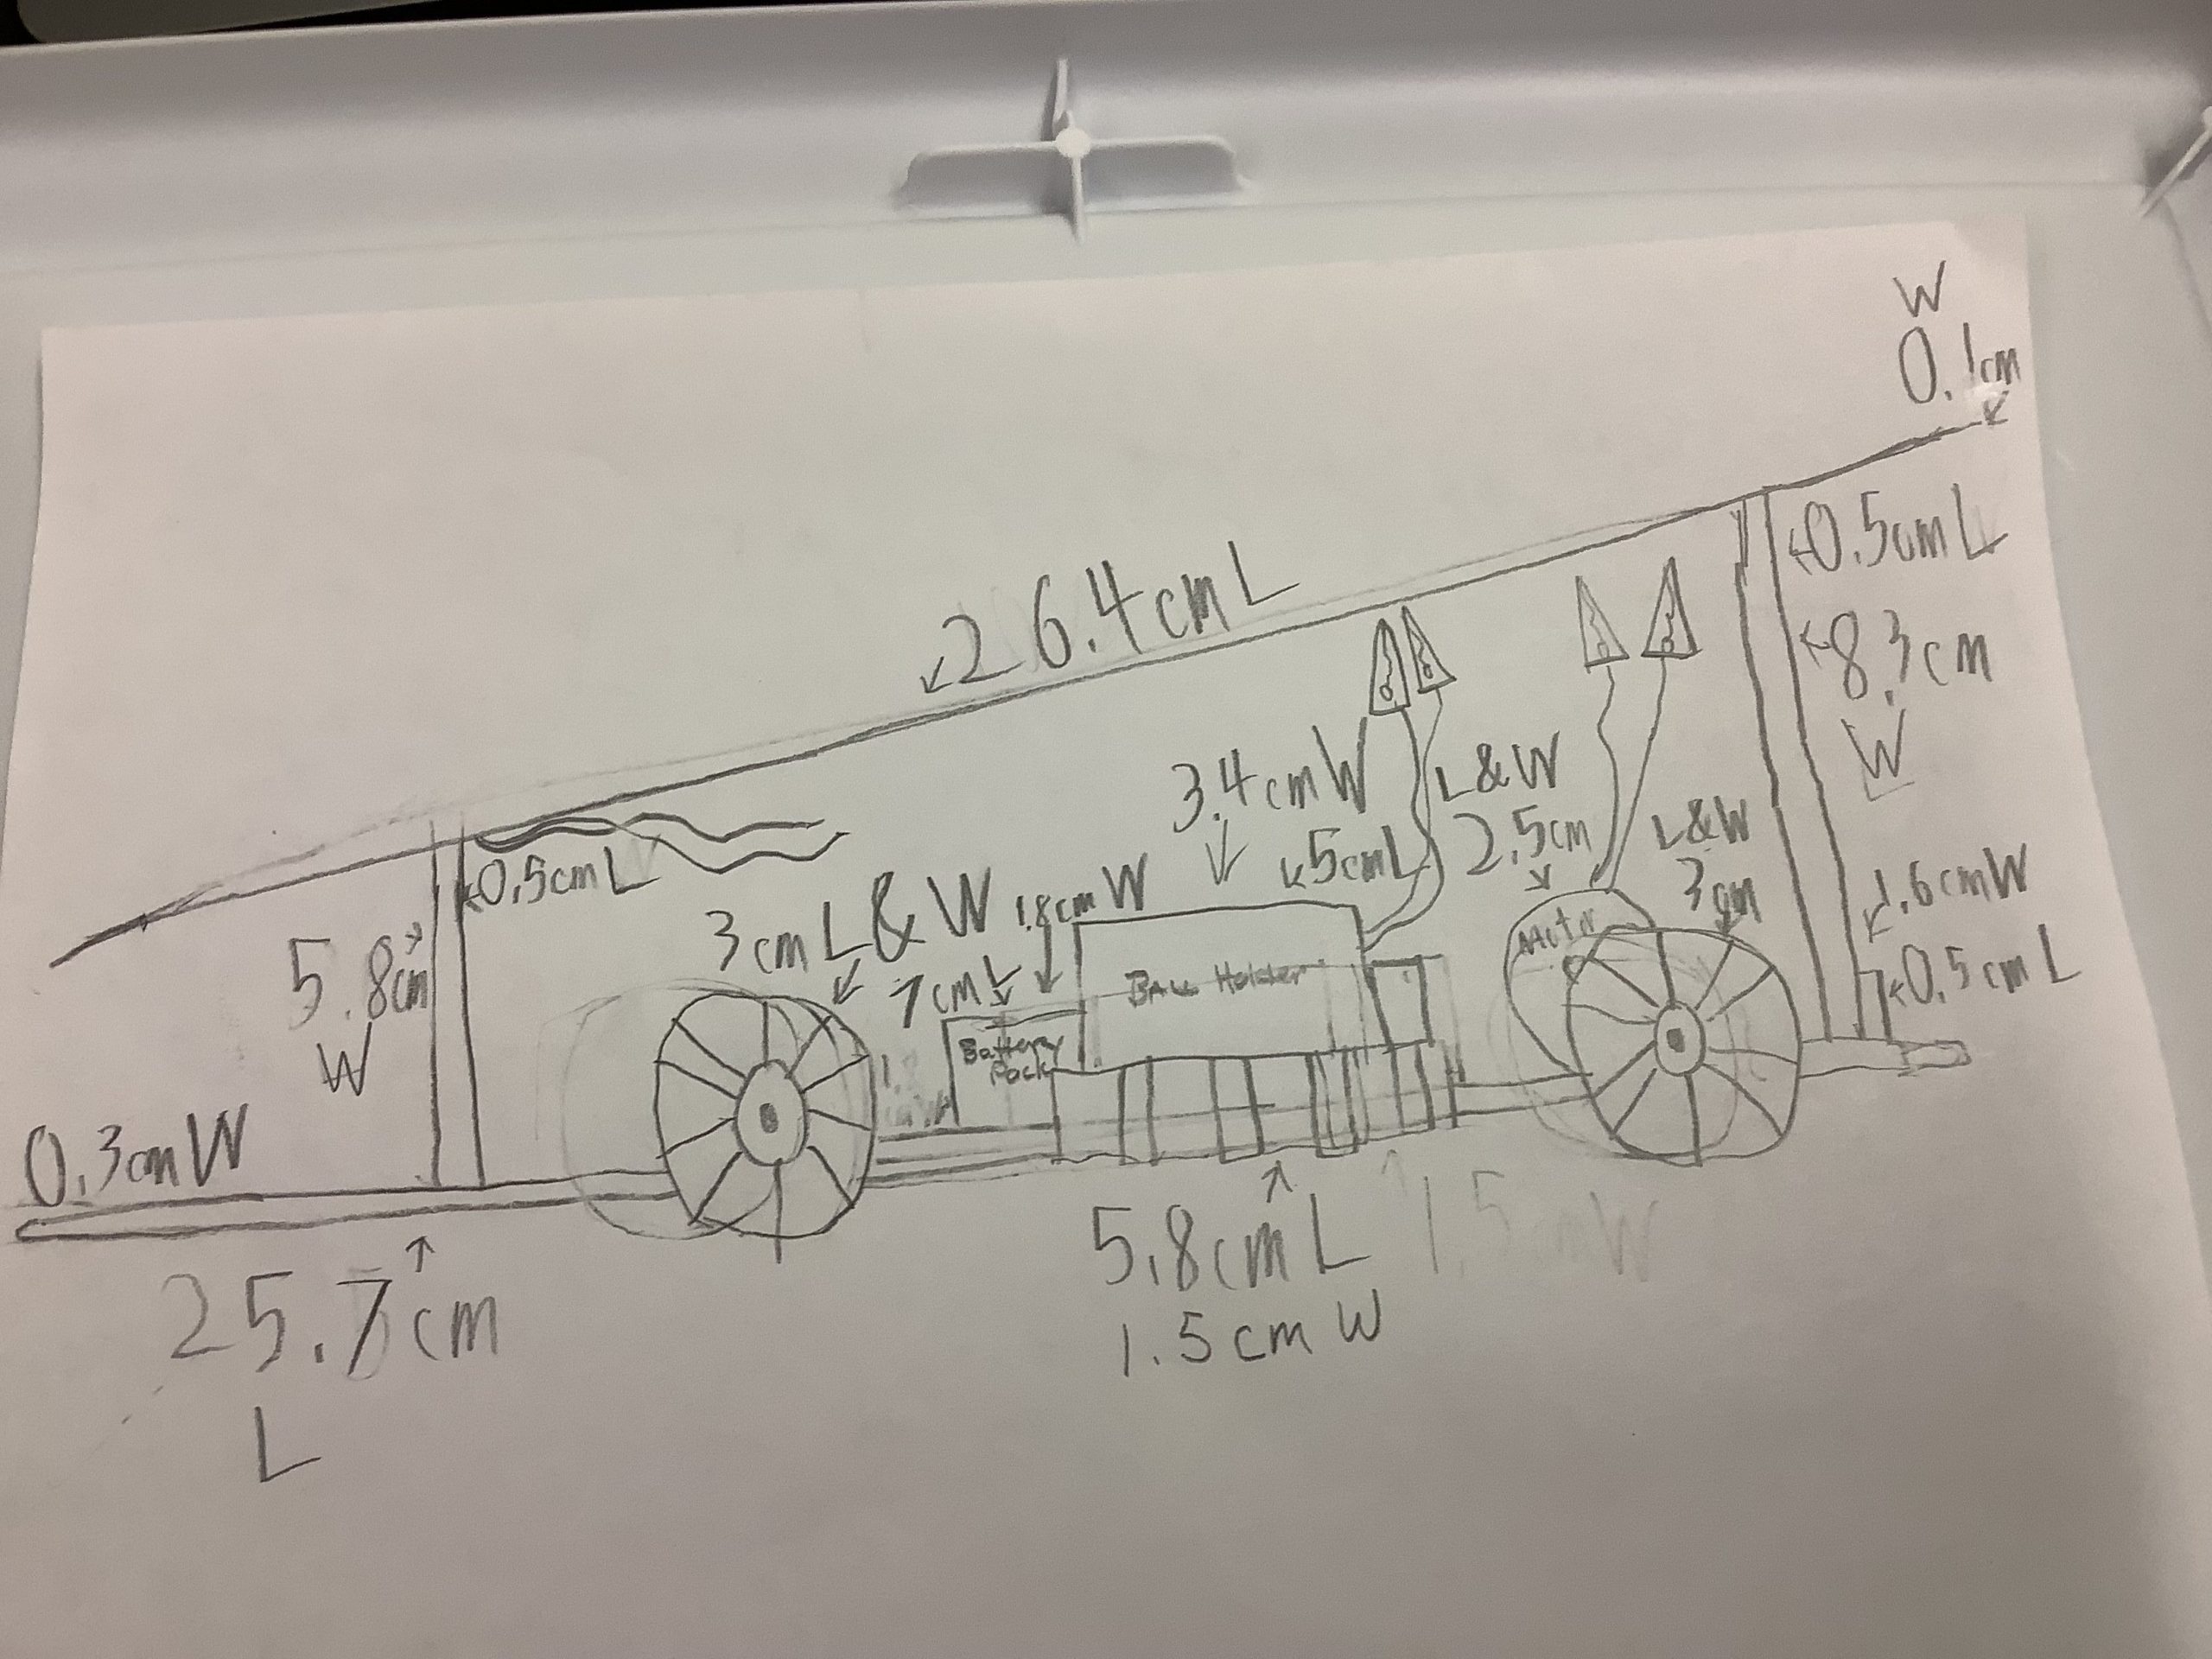
Design Drawing: Side View
Final Car Specifications
| Car Size with Panel | Length: 27.3 cm | Width: 15.5 cm | Height: 10.1 cm |
| Weight with Panel | 275.3 g | ||
| Wheel Size | Front wheels: 3.0 cm | Back Wheels: 3.0 cm | |
| Gear Ration | motor gear: axel gear 13:46 |
Materials Used
| Item | Approx. Cost |
| New: | |
| Pitsco Ray Catcher Solar Panel (3V) | 38.25 |
| small white gears, wheels and axels | 3.99 |
| Pitsco Motor (3V) | 5.25 |
| balsa wood | 3.99 |
| spacers for bearings (4) | 2.31 |
| battery pack with switch | 1.26 |
| piece of black binder comb to hold guide wire | 0.07 |
| alligator clips (4) | 0.28 |
| Consumables: | |
| tape | |
| solder | |
| Velcro | |
| hot glue | |
| Recycled materials: | |
| cardboard roll | |
| Total Cost: 55.40 |
Test Results / Trial Runs
Test Runs 1 – date: 2/29/24
Weather conditions: We ran the car in the hallway outside of the Innovation Lab
Ran on panel or battery? We ran on battery.
Observations of results: Car is turning. I only ran it once because I didn’t want it to hit the wall.
Any recommendations for improvements: We have to check the axels to see if they are straight. We also need to check to make sure that the batteries are good.
| Attempt | Time, S (seconds) | Distance, M (meters) | Speed, M/S |
| 1 | 11.44 | 16.5 | 1.82 |
| 2 | |||
| 3 |
Test Runs 2 – date: 3/14/24
Weather conditions: It was partly cloudy.
Ran on panel or battery? We ran the car on solar panel when it was sunny and on battery when it was cloudy.
Observations of results: Our car ran fairly straight and fast.
Any recommendations for improvements: We have to reinforce our panel holders because they keep falling off.
| Attempt | Time, S (seconds) | Distance, M (meters) | Speed, M/S |
| 1 – panel | 7.53 | 17 | 2.26 |
| 2 – battery | 6.91 | 17 | 2.46 |
| 3 – panel | 8.34 | 17 | 2.04 |
| 4 – panel | 7.90 | 17 | 2.15 |
Test Runs 3 – date: 3/16/24
Weather conditions: Sunny
Ran on panel or battery? We ran on both battery and panel to get times with both.
Observations of results: Based on the times on battery vs panel, we think our batteries were bad.
Any recommendations for improvements: Our car is running well. We have to check the wires to make sure they are making good contact.
| Attempt | Time, S (seconds) | Distance, M (meters) | Speed, M/S |
| 1 – battery | 10.5 | 20 | 1.90 |
| 2 – battery | 11.0 | 20 | 1.82 |
| 3 – panel | 8.24 | 20 | 2.43 |
Test Runs 4 – date: 3/24/24
Weather conditions: Sunny
Ran on panel or battery? Panel
Observations of results: Our car ran fast and straight! We only got to run one time because other people needed the track and we were also working on the webpage.
Any recommendations for improvements: We only had time to run once but this was our fastest time so far!
| Attempt | Time, S (seconds) | Distance, M (meters) | Speed, M/S |
| 1 – panel | 7.00 | 20 | 2.86 |
| 2 | |||
| 3 |
Video of Our Car Running
Car Features Video
Additional Information
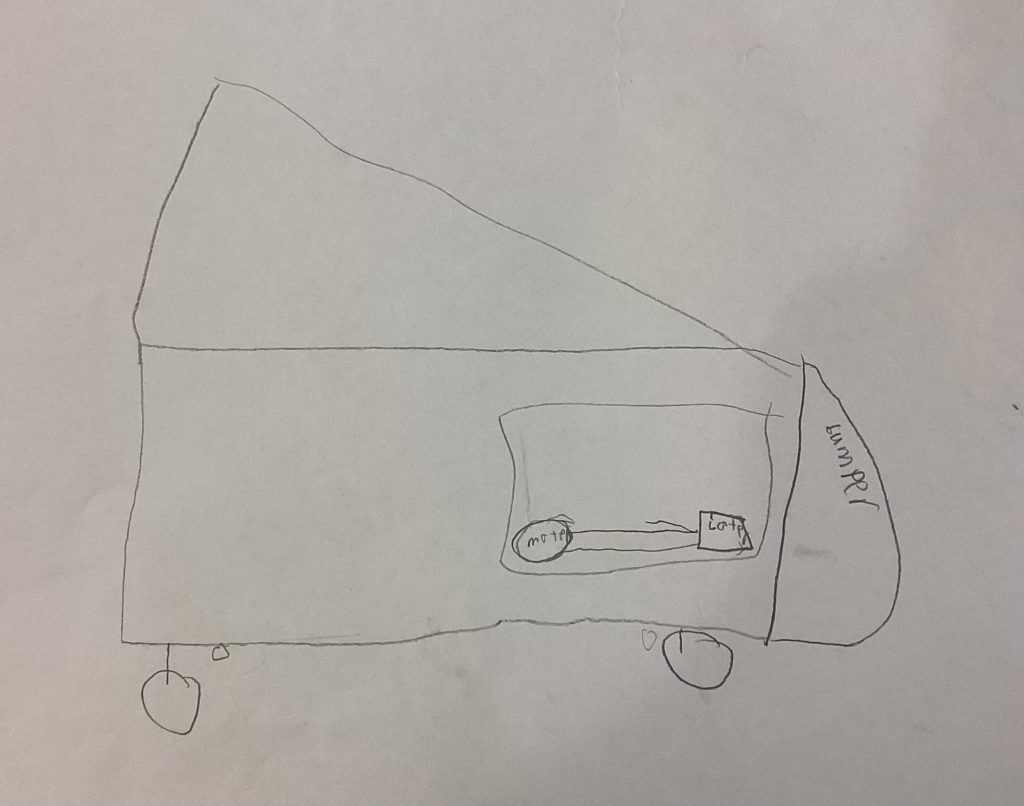
Drawing of Our Original Car Idea
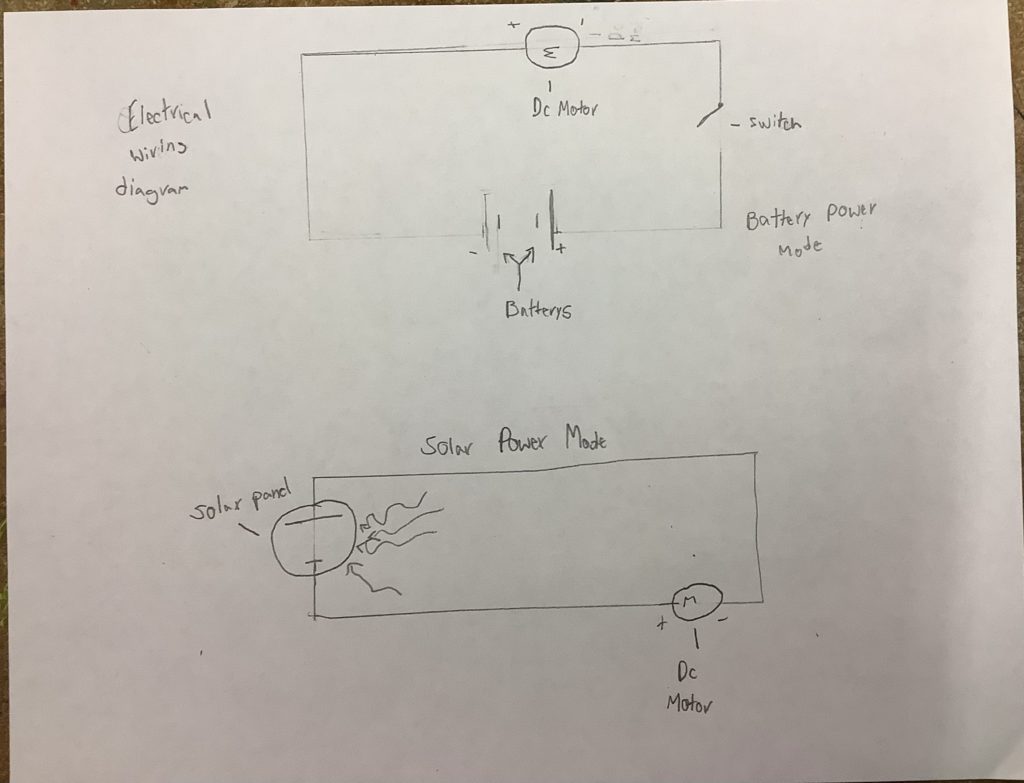
Electrical Schematic: This is our schematic of the electrical circuits. It is the same DC motor in both drawings.
Love your humor. Great documentation on the website!